From tuning to miking, a comprehensive look at setting up and recording a drum kit
By Joe Albano
As any engineer will tell you, the first step to getting a good recorded drum sound is to start with a good live drum sound—if the sound of the kit’s not happening in the room, you’ll be fighting an uphill battle all the way. As an engineer, you’re fortunate when a good studio drummer comes in with his/her own top-of-the-line kit and sets everything up beautifully. However, that’s not always the case—as often as not the responsibility of setting up falls to the session engineer or recordist.
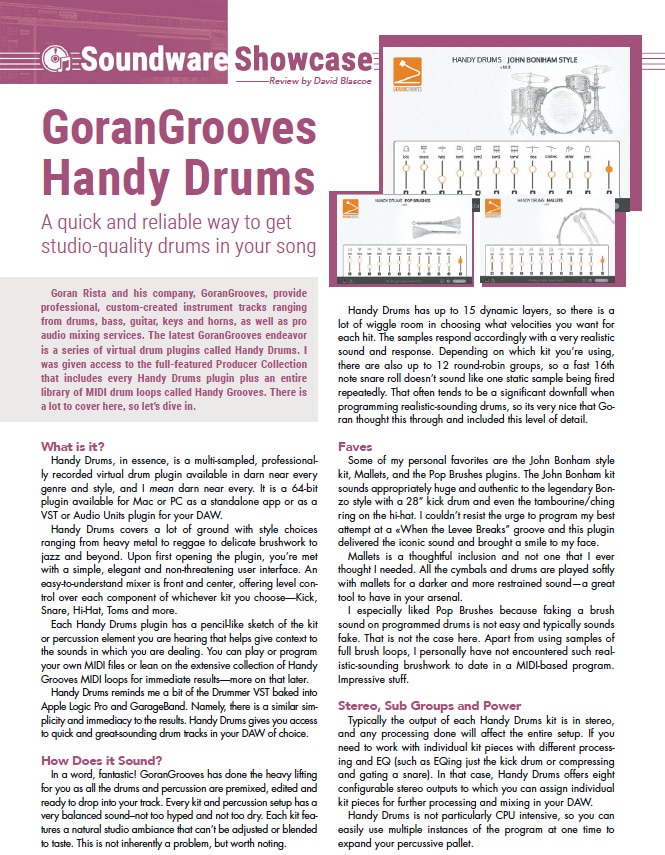
We assume that most engineers and musicians are at least somewhat familiar with the individual elements of a standard trap kit, and already know how to arrange the drums and cymbals for a typical setup (Figure 1). We’ll start by looking at the key aspects of prepping the kit for recording.
Go to the head of the class
When the kit has been set up in a standard layout, attention should turn first to the drum heads. Periodically, they’ll need to be replaced—if the existing heads are so pockmarked that they resemble the lunar surface, it’s probably wise to change them for that important session! Nowadays there are quite a number of different types of heads available from companies like Remo, Evans, and Aquarian, and the choice of heads will significantly affect the sound.
In the old days, drumheads were made of calfskin, but modern heads are typically plastic. The most common variation is the number of layers of material the head is made of: single-ply (one) or double-ply (two). Single-ply heads have the brightest, most open sound, with a lot of overtones, but can be trashed by hard-hitting players; double-ply heads are more durable, and have a somewhat thicker, slightly darker tone. There are also heads which incorporate additional damping to control the overtones—I’ll get back to them when I talk about damping, below.
Most drums use both top and bottom heads these days. The snare’s bottom head is a special extra-thin type, and its top head sometimes has a rough “coated” surface, for brush work. For a basic general-purpose setup, you can’t go wrong with traditional, open, single-ply heads, or, if you anticipate a hard-rock style drummer or band, perhaps double-plys for that session.
Getting in tune
Once the heads are chosen they need to be tuned. Drum tuning can often seem like something of a black art; there are no absolutes, but there are a few basic guidelines that can help. First off, most drums have a tuning range where the drum “speaks” best, based on the natural resonance of the drum shell itself. As you adjust the tuning, you’ll hear that the sound is the loudest and fullest around a certain range of tension—this is usually a good tuning for that drum. As far as the kick drum’s batter head is concerned, usable tuning can range quite a bit, from very loose (just above the point at which the head starts to wrinkle), for a real “thwap”, or very high for a tight, well-defined “thump” (don’t you just love all this technical drum terminology!).

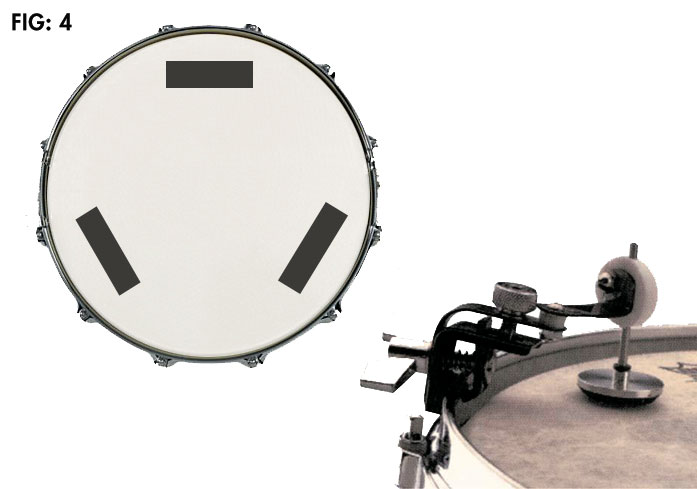
Here’s the procedure for mounting and tuning the heads, starting with toms and snare. First, remove the rim, and position the new head on the bearing edge of the shell; then, lay the rim over it and tighten the lugs (usually 6 to 10 of them) as evenly as possible, with finger-pressure only at first. When this is done, take the drum key and begin to tighten each lug one or two full turns each, going from each lug to its opposite, and then moving around the drum (as indicated in Figure 2) until all the lugs have been tightened equally. Make sure to make exactly the same number of turns on each lug, to keep the tension even around the head—tap the drum lightly next to each lug to confirm even tension.
Continue this procedure with smaller adjustments (1/2-turn or 1/4-turn each lug) until the head starts to make slight cracking sounds. (This is normal—it’s like tuning up new guitar strings, you’re gently stretching them out so they won’t slip later in normal usage). Then bring the tuning down to the point at which the drum achieves its fullest sound, as above.
Do this procedure for all the drums (some drummers install the bottom heads first, and damp them when working on the top heads, for clarity). When it comes time to fine-tune the toms’ bottom heads, there are basically three choices: tune each to the same tension as that drum’s top head (for the fullest sound); tune the bottom head lower (for a slightly falling pitch); or tune the bottom head higher (for a shorter, dryer sound). The snare’s bottom head is damped by the snares themselves—many drummers tune it tight, but whatever works is fine. The kick drum’s front head is a whole case in itself—again, see the next section on damping.
Cutting out the ring
Now, when the drums have been tuned as above, they will most likely produce a big, open, ringing sound with long decays and lots of high overtones—this will be especially true while you’re standing in the drummer’s position. This wide open sound may seem to be too much, and many novice engineers will reach immediately for their favorite fixer, a roll of gaffer’s tape, to damp down all that glorious ring and tighten up the sound of the kit to something approximating what they’re used to hearing on their favorite recordings.
But hold on—don’t be too quick to tape up that kit! As any drummer can tell you, the live kit in the room really won’t sound very much like a typical recorded drum sound, and that’s normal—in fact, if you damp down the drums acoustically so they sound more like a recording, chances are when you do finally record them, they’ll sound too short, choked, dead, and lifeless. Damping is one area where a little really goes a long way, and sometimes nothing at all is best! That said, here are a few approaches to damping the kit, when appropriate.
Pre-damped heads
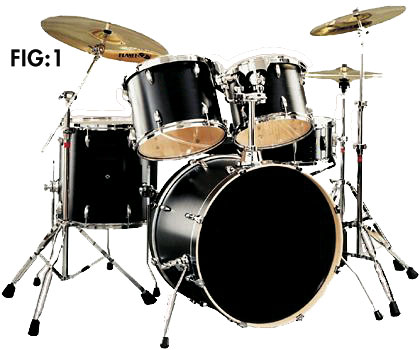
Before turning to external damping techniques, if you know that you’re going to want a slightly more controlled sound, one good option is to try some of the specialty drumheads that are available (Figure 3). Besides the basic single- and double-ply types mentioned above, there are a number of drumheads available with some damping built into the head itself. These are often a good choice, as they’ve been designed to provide a more controlled sound without choking the note excessively—excessive choking is easy to do with tape and other approaches.
Remo’s Pinstripe heads are popular—they feature a second layer around the outer edge of the drum head, damping it where the higher overtones are most prominent. Another popular type are heads with a black or white dot (an extra layer) in the center, which, while affecting the sound differently than the Pinstripes, also offer a darker, more controlled sound. There are even two-ply heads with a little oil between the layers (Evans Hydraulics), for a very dry sound (these were popular in the ’70s). Modern designs like Evans’ EQ and Genera heads offer a very “finished” sound right off the drum even before miking and processing. All these types of pre-damped heads can be used on toms and the snare batter head.
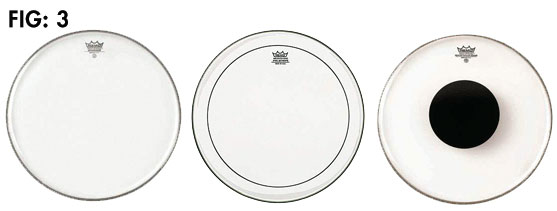
 If regular (undamped) heads are in use, and some acoustic damping is deemed to be necessary, a little bit of tape near the rim in one or a few spots is usually enough (see Figure 4). Some people tape a small wad of tissue paper, or hang a wallet over the rim. Clip-on dampers are also available that go either outside or inside the drum, though in my opinion the inside ones tend to choke the drum far too much. Another common technique is to cut a ring out of an old head and lay it around the edge (or part of the edge) of a drumhead—this will result in a highly damped sound, but it can be useful at times, particularly on snare.
Sometimes, if a particularly nasty overtone is present (often common on snare), a little damping may help, but a better solution might be to retune the drum carefully, or reposition a mic, or adjust the tension of the snares and the bottom head. Some drummers will detune one lug to try to control a stray over-ring, although this can have other effects on the sound. Personally, I think the best sound is achieved by leaving the drums as wide open as possible, and using (minimal) damping only as a last resort when time and other options have run out.
Kontrolling the kick
Now, all of the above pertains mainly to damping the toms and snare—the kick follows its own set of rules. The traditional jazz kick was a double-headed drum (just like the toms), and was played wide open and quite boomy, at least by modern standards (sometimes a felt strip was used for a little damping, on the batter head).
The front head of the kick aids projection, and the sense of boominess and ring is greatly reduced at a bit of a distance (this is true for all drums). However, with the advent of close-miking of rock drumkits, that boomy double-headed kick sound gave way to the tighter thump of today’s kicks. Initially, cutting holes in the front head to reduce the boom progressed to a complete removal of that head, for a sound from the batter head only, with a stronger attack and a shorter decay.
To tighten up the kick sound, it also became common practice to stuff pillows or blankets inside the kick, up against one or both heads (if applicable), held in place by a weight like a brick or a mic-stand base. In the ‘70s and ‘80s, the trend for single-headed drums extended from the kick to the toms as well—these so-called “concert” toms, like the kicks of the day, had a sharp attack and a shorter decay.
But just as the single-headed concert toms went the way of the big-hair bands, kick sounds also opened up a bit, to find a happy medium. The single-headed kick is still alive and well, as is the use of blankets etc. inside the drum, but double-headed kicks are back too. The use of front heads with holes cut in them is common—a small hole just off-center is a popular approach, allowing for a mostly double-headed sound, but providing a little control and an opening for a mic.
Also, computer-designed front heads with specifically placed holes or perforations can precisely control the drum’s amount of thump vs. boom. And experienced engineers realize that even a fairly boomy kick will sound much less so in a busy track—the extra resonance will help it hold its own in the mix.
The kit and the room
There are a couple of considerations that apply to the kit as a whole. One is the relative tuning of the drums, particularly the toms. Though they’re only semi-pitched at best, it’s possible to tune them to approximate musical intervals—thirds or fourths are common.
Another overall issue is the tendency of the snares to buzz sympathetically. Now, this is entirely normal, and not necessarily a problem—a little sympathetic buzz (and ring) contributes to an overall sense of air and presence in the recording. However, if it seems like too much, a bit of careful retuning or damping of the snares themselves may reduce the buzz to acceptable levels.
There’s one more key component of the acoustic sound of the kit, and that is, of course, the room itself! Even the best-sounding drums will sound relatively weak in a tiny dead room—this kind of very dry sound was big for a while in the ‘70s, but current preferences run to something more open. It doesn’t have to be like the big-room gated excesses of the ‘80s, but a nice natural ambience will help to give the kit great presence and tone.
Naturally, this isn’t always an option (especially in smaller project studios), and a bad room can sometimes be worse than a dry booth, but if your ears tell you that the room has potential, try and take some time to position the kit and mics to take best advantage of the room as a resource!
Mics, mics, mics
Despite the massive track counts available to today’s recordists, sometimes simple stereo miking of the drum kit is just the thing for certain applications. The simplest approach is to place a pair of mics (or a single stereo mic) either a few feet in front of the kit, or a few feet overhead (see Figure 5). This will capture both the entire kit and a bit of room sound. If using overhead placement, an additional mic in front of the kick can help—since that drum is perpendicular to the overhead mics, they’ll normally pick up a weaker kick sound with less punch.
Now, the sound of a kit from stereo miking will not be like the tight focused drum sounds on most pop records since the ‘70s—it’ll be more like the unvarnished sound of the kit in the room (like an unmiked kit in a small club). The tone of the drums may seem a bit more boxy (midrangey), and the cymbals a bit more splashy, but the kit should have a nice subtle ambience (thanks to the room’s contribution). A lot of classic recordings were made using this simple kind of setup.
Mic selection
I won’t have space here to review microphone basics—I’ll just go over some of the usual choices for drum recording. There are lots of articles about mics in this website’s online resource library.
For stereo miking as described above, condenser (also known as capacitor) mics are usually employed—these will provide the most open, detailed sound quality. Either large-diaphragm or small-diaphragm models will do, in any of the usual stereo configurations, such as XY, coincident/near-coincident, or spaced. Popular choices include classics like the AKG C 12 and C 414, the Neumann U 87 or KM 83/84, and equivalent models from Audio-Technica, Shure, and others. Single stereo mics are also good—one of my favorites is the AKG C 24 in front of the kit, for a nice crisp natural sound. Cardioids are typical, but so are omnis, if the room is good and isolation isn’t an issue.
Since you won’t have each drum on a fader in this situation, the balance of the kit has to be obtained via mic placement alone. Take a little time to ensure that all the elements are in good balance, using both the live sound and the balance in the track as a reference. Angle the mics a bit more inward or outward to widen or narrow the stereo image—sometimes asymmetrical placement of overhead mics will result in the most centered stereo spread. And if you are using directional mics, make sure that you’re not pointing so directly at one particular drum or cymbal that it sticks out unnaturally in the drum mix, either volume-wise or tonally.
Getting in close
 Close-miking usually means placing a directional mic an inch or so from each drum, pointing at the top head near the rim (see Figure 6). The angle of the mic can vary—some like to point it downwards near the rim, where the higher overtones are prominent, while others like to angle it towards the center of the drum, where the sound might be a bit fuller and the stick impact might be emphasized. Either way works just fine, use your ears to find what works best in each situation.
Since the idea is usually to isolate just the individual drum for that mic, some variation of a cardioid pattern is often employed (regular, hyper-, super-), depending on the position of the other drums that you want to reject. As to the type of mic element (condenser or dynamic), well, dynamics are often used in close because of their ruggedness (in other words, their ability to take a hit from an errant drumstick!), but this is not a hard and fast rule. Many modern instrument condensers are up to the task, and the choice should be based on what works best for that kit that day, rather than on convention.
Rack ‘em up
Okay, so let’s start by looking at the toms. Normally, each tom will get its own mic, positioned as in Figure 6, on the top head of each drum. Some people occasionally like to mike up the toms’ bottom heads as well, but this is not as common as using two mics on snare or kick. Some kind of cardioid pattern would typically be chosen.
If the kit has an unusually large complement of toms, or if mics/ inputs are in short supply, you can consolidate by using a single mic between two toms in bidirectional pattern; pickup will be fine, but of course you won’t be able to separate this pair in the mix later for panning or processing.
Some traditional choices for tom mics are Shure SM57 or Sennheiser MD 421, although good results will also be had with some of the hardier small-diaphragm condensers, or even large-diaphragm models like the AKG C 414. I usually go dynamic and prefer the 421, as it is both a bit brighter and fuller than the 57 for this application. A matched set is a good idea, though sometimes a different mic will be employed to capture the deeper resonance of the floor tom—this will depend on the particular drum.

Capturing the backbeat
When it comes to the snare, mic type and placement advice is much the same as for toms. Pay special attention to the angle of the snare mic relative to the position of the hi-hat—adjust this to control how much isolation you want (or don’t want) between snare and hat in this mic.
As to mic choice, condensers are often a good choice when you want a crisp sound, but the widely-preferred favorite snare mic (at least for rock drums) is the SM57. There’s just something about the presence boost and the crack that the 57 imparts that makes people choose it time and time again over more high-falutin’ options.
Now remember, the snare drum is unique in that it has, well, snares (!) on the bottom head. There isn’t universal agreement as to whether it’s worth miking up the bottom of the snare drum. Some engineers feel that the overheads and top snare mic pick up enough snare buzz, and they like the thicker “pop” of just that combination; others like the extra crispness that the bottom mic can add, and they prefer the flexibility of being able to mix that quality in, especially if they have enough tracks to record the bottom mic on its own so they can balance it later in the overall mix. I fall into this latter category—whenever possible I use a bottom snare mic on its own track. I find I can really get a much wider range of snare tones in the mix with this extra element; sometimes it’s even fun to mess up the snare sound with an extra strong dose of bottom mic, for a real trashy garage-band sound.
If you do decide to use a bottom mic, a condenser might be a good choice, to catch the detail of those buzzing snares—I like a 414, but even a vocal condenser like an AKG 535 has worked down there just fine.
Also, keep in mind that the bottom head of the snare is going to be moving in tandem with the top head as the heads vibrate. However, the two mics are pointing at those two heads from opposite directions, so the resultant signals will be in opposite polarity—as the top head moves towards the top mic, the bottom head moves away from the bottom mic, and vice versa (Figure 7). Consequently, it’s common practice to reverse the polarity of the bottom mic’s signal, either with the polarity (sometimes called ”phase”) button on that channel on the console, or lacking that, with a (carefully marked!) mic cable that has the hot and neutral leads reversed.
Down below
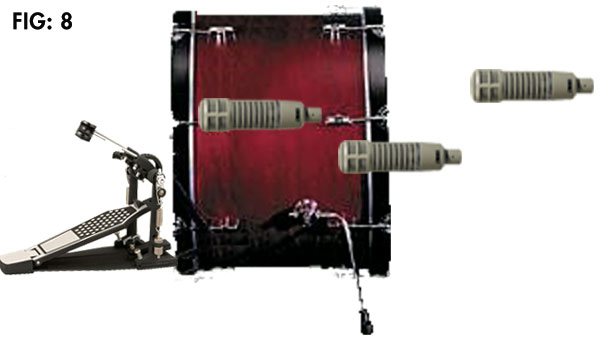
As you might infer from the earlier discussion of heads and damping, there are a lot of options for miking up the kick drum, depending on the setup (Figure 8). The easiest is with a single-headed kick (front head removed, with a pillow or blanket inside, against the batter head). Typical mic positions would range anywhere from just in front of the drum to slightly inside to all the way up almost against the back of the batter head. As you’d expect, the sound would vary accordingly, from a solid thud to a more resonant thump to a sharp thwack.
Additionally, you can position the mic either pointing straight in at the beater or slightly off-center or nearer to the edge of the drum, to determine how much impact and attack is picked up. It’s also common to forgo the use of a mic stand and simply lay the mic on whatever blanket/pillow/foam is inside the drum, pointing at the batter head.
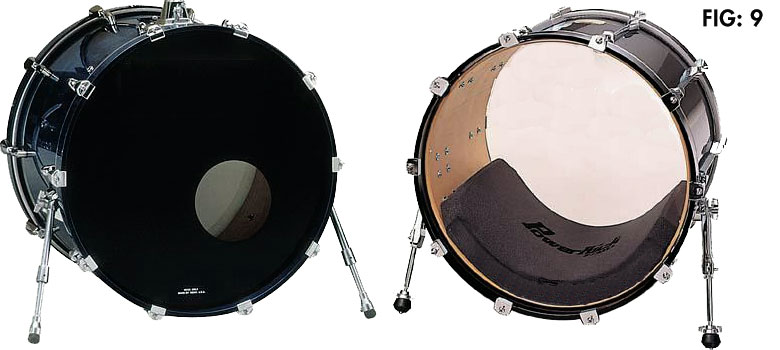 When there’s a front head on, it gets a little more difficult. If the head is solid, then obviously you’ll have to find a position in front of it, anywhere from a few inches to a foot or two away, looking for the tightest sound as you move the mic around. More typically nowadays, there will be a hole cut in the front head. This not only vents the drum, but also gives you the option of positioning the mic just inside the hole, for more of the attack of the beater (Figure 9). If the hole is very large, or if only the edge of the front head is left, then the drum behaves as a single-headed drum, as above.
As to mic type, once again, there’s a pretty wide range of choices. Directional dynamics would be most common, for good reason—the air pressure from a kick drum could potentially be damaging to a more delicate condenser. Nonetheless, I’ve seen people stick even very expensive condensers inside a kick; however, my suggestion to you is: don’t do it!
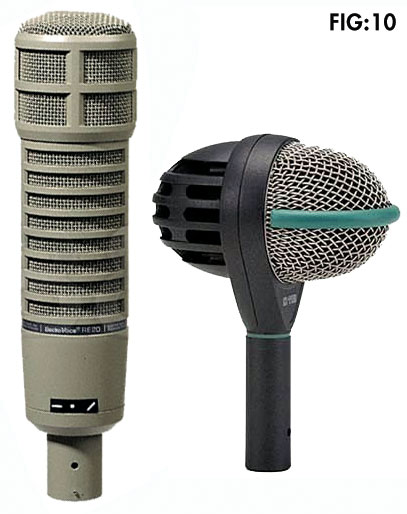 Some of the same mics employed for the toms could work here in a pinch, like the 421 and even the 57 (although both of these, especially the 57, are really too light on the low end for this purpose). A better choice would be one of the many dynamics specifically designed for the kick, from companies like Audio-Technica and AKG—a popular model is the AKG D112 (Figure 10), which, like many dedicated kick drum mics, has a frequency balance optimized for kick, that’s designed to sit well in a mix even without further EQ.
My personal favorite is the Electro-Voice RE20 (ubiquitous as an announcer’s mic)—its complex arrangement of baffles tames the usual proximity effect, for a very natural, un-hyped low end that extends way down for a truly solid thump (also in Figure 10).
Another kick-miking technique that’s become popular is the use of boundary mics, either on the floor a foot or two in front of the kick, or inside (on the blanket or pillow, as above). Obviously, the inside placement will pick of a lot of the shell resonance, while the outside mic will pick up more than just kick, but this can often be a good choice for a relatively undamped kick.
Remember, in every case (toms, snare, kick) the drum sound is ultimately going to be the combination of the close mics and the overheads, so keep that in mind as you audition the individual mics around the kit.
The hat and cymbals
The cymbals will be picked up strictly by the overheads—their complex sound needs air to develop, and consequently requires the extra few feet of distance from those mics for a nice open sound (refer back to Figure 5). The hi-hat, however, can go either way.
There’s often enough of the hat’s bright, splashy signal in the overheads (and even leaking a bit into snare and tom mics) to provide adequate coverage in a pinch—nonetheless, it’s common practice to close-mic the hat, especially when the drummer is doing a lot of subtle, rapid little figures (think Stewart Copeland or Steve Gadd). Here, a directional small-diaphragm condenser is the usual choice, with attention paid to isolating it from the adjacent snare and tom. Some popular models are the AKG 450 series, the Neumann KM 83/84 (or the modern equivalent KM 183/184), the Shure SM81, the Audio-Technica AT4041, and a host of others.
Adding the room
Finally, now that you’ve got both overheads and individual mics set up, you may want to add even another set of stereo mics, primarily to pick up the room. Now, of course, this is only worth doing if the drums are in a good room that can actually add some oomph to the recording, as opposed to a dead little booth, but if the kit sounds good from a little bit of a distance, even if it is a relatively small space, that ambience might have something to contribute and could be worth capturing.
The approach to adding room mics would be pretty much the same as for overheads, except you’d move the mics several feet further away—sometimes you can even direct the room mics away from the kit to pick up a more diffuse ambience. Use the same condensers or stereo mics as described earlier. Some folks even use “near” and “far” room mics (all on separate tracks of course) for even more options later on.
Well, that’s about as much space as we can devote to miking; let’s move on to the actual recording of the kit.
Laying it down
Levels will naturally be the first concern for the recording. Drums are highly dynamic, with very strong transients, and this needs to be taken into account. In a typical modern session, recording to a digital workstation, there should be some kind of peak metering available to warn you when you’re getting near digital full scale (0 dBFS). As long as levels stay a few dB below this, everything should be okay.
In fact, since transients are so short, the occasional over might pass unnoticed, but since digital metering does not necessarily give you a way to know how far over you’ve gone, caution is the rule here—a momentary red light flashing now and again is probably okay, but anything more frequent or more sustained, no matter how short, should be cause for concern.
Sometimes drums are still recorded to analog tape, specifically for the quality that this brings to the recording. As the level to tape is increased, the tape gradually starts to distort, with some gentle harmonics at first, and also to saturate, compressing the signal subtly. Both these artifacts can lend a highly desirable quality to drum recordings, and experienced engineers frequently “push levels” to tape to get this effect. But remember, if you came up with digital systems and you’re not used to this technique, be careful—too much of a good thing here can easily get nasty.
When setting levels, engineers will usually ask the drummer to go around the kit hitting each drum one by one, while they set the level and also listen for any other problems. Then the drummer is asked to play a bit of the song, to see how playing style and leakage affects level and sound.
One thing about this—no matter how hard the drummer seems to be playing during this sound check, nine times out of ten he’ll play harder in the heat of the moment when the recording is actually going down, so I’d recommend, when setting levels, to always leave at least a few dB of leeway for this eventuality.
When checking the individual mics, it may become apparent that there’s more leakage than you’d prefer, and sometimes mic positioning can’t completely eliminate it. In this situation, some engineers will apply noise gates to the individual drum mics, set to allow the primary drum through, but to close down on leakage from the other elements of the kit whenever that drum isn’t playing, cleaning up the overall signal.
However, overly aggressive gates can clip the primary signal a bit—this may result in a shorter and less ringy sound for that drum, and it can also cut things too short or stutter as the drum decays, when leakage is strong. For that reason, I prefer to avoid gates in tracking. Actually, I prefer to avoid them, period—I usually find that careful mic placement can get the job done well enough, and what little leakage typically remains simply contributes to the ambience and “liveness” of the recording.
And that brings up the question of processing in general—should EQ and/or dynamics be applied on the way in, or on playback? Well, every engineer has his/her own way of going about this, so I’ll give mine: I prefer to record the drums flat, no EQ, no compression, just a few good mic pres, and save all processing for the mix—I simply like to give myself a more neutral canvas to work with.
Putting it all together
Okay, so the recording’s finished, and now you’ve got typically 8–10 tracks of drums to play with—kick, snare top, snare bottom, three (or more) toms, hi-hat, and two overheads, plus room mics, when applicable. Many people like to start building a drum mix by soloing the individual drum mics (usually beginning with the kick), and building it up one element at a time, adding EQ and compression as they go. Others prefer to start with the overheads as the basic “live” sound of the kit, and then add the individual elements to that for depth and punch.
A third way is to combine both of these approaches: build up the kit mic by mic, but also include the overheads as you’re processing the individual drums, since it’s the combination that will ultimately make up the finished drum sound. I like this approach, as it keeps you grounded in the kit’s natural sound, and helps you avoid overprocessing on individual elements, which is easy to do when you’re focused in on only one thing at a time.
Overall, you can lean toward a mix that favors the overheads more for a roomy natural sound, or one that favors the close mics more, for a dryer, punchier, more “recorded” quality. Elements like the bottom snare mic and the hi-hat mic can be added in to taste, or even not at all, although I usually use them both.
When panning the elements of the drum kit, you’ll have to decide on audience perspective or drummer’s perspective—that is, do you pan the hat left/ride right/etc. as the drummer sees them (assuming a right-handed setup), or the opposite, as the audience sees them? This really is a matter of choice. Many engineers let the mix determine it—if the drum sound is more roomy and distant, then audience perspective makes the most sense, but if the drums are very tight and close, and other instruments also sound more up front, then drummer’s perspective may win out.
Likewise, the overall width of the kit can be adjusted accordingly depending on the song, from a wide spread all the way between left and right to a narrower field as it might appear on stage from a distance. Finally, it’s a good idea to try and match the pan positions of the individual drums to the positions of those same drums in the overheads’ stereo field, for the tightest image.
Setting the tone
So now let’s take a brief look at some of the processing that may be applied. Special effects aside, there are basically two main types: EQ and dynamics. As far as EQ goes, I could go through each drum one by one suggesting specific EQ settings, but, honestly, that will vary so much depending on the kit, the mics, and the room, that it may be more useful to simply offer a few general suggestions, based on my experience and preferences.
Most drum EQ is geared toward adding a bit of depth and a bit of crispness, while taming the boxy, or “cardboardy” quality that recorded drums often have. To that end, it’s common to see a midrange cut employed, ranging from 200–300 Hz to 1–2 kHz, depending on the size of the drum.
Snares may get a little extra boost in the upper midrange for presence (around 2–5 kHz). Kicks often get a bump at around 100–150 Hz for oomph, and another at about 2 kHz to accentuate the slap of the beater, when desired. Hi-hat and cymbal overheads usually just get a little high end added for clarity. Normally a few dB boost or cut is all that’s required—if the sound seems to need too much EQ, try changing or adjusting the mics instead.
Squeezing the skins
Compression has always been a big part of recorded drum sounds. Even in the days of simple stereo recordings, a good compressor was often used to fatten up the kit, and many classic drum tracks have benefited from dynamic processing. Even on multi-mic recordings, the use of overall stereo compression is widespread, and is an integral part of modern drum sounds. One caveat, though—keep in mind that a lot of compression and limiting is normally applied these days in mastering, and, along with the compression applied here in the mix, can add up for an overly squashed drum sound. It’s best to ease up a little at the tracking stage if you expect or plan for this to happen.
It’s not uncommon for the kick, snare and toms to have compression applied to them independently, sometimes in addition to overall compression. Classic tube and opto compressors are often favored for this application—when attack and release controls are available, they can be set to either bring out the attack for an aggressive “pop” (snare), or to emphasize the decay for a big booming tone (kick and toms). A detailed discussion of specific settings is beyond the scope (and length) of this article, so I’ll move on to a quick look at bus compression of the stereo drum mix.
Slamming the bus
The most obvious way to apply stereo compression to the entire kit is to submix everything in stereo into a pair of channels (or a stereo channel on a DAW), and strap a stereo compressor across this bus. Subtle settings will get the job done here (unless you’re deliberately going for special effect), with a lower ratio, and less extreme shaping from the attack and release controls—just enough to fatten up the sound and give it warmth and presence. This can also bring out the ambience in the recording, for a bit more depth as well. In addition to compressing the overall drum mix, engineers sometimes separately compress just the room mics, for a big ambient sound (although it’s easy to go overboard doing this).
Another trick I’m particularly fond of is “sidechain” compression. A separate drum submix is set up via aux sends and run in parallel with the original tracks, and then compression is added to the submix only. The compressed sidechain is then blended with the uncompressed main drum mix, for a sound that retains all of the transient energy of the original, but adds some of the thickness and density of the compressed version—this is one of my favorite techniques.
I tend to use somewhat more extreme compressor settings here for a more pronounced effect, and then mix in as much as sounds good. One caveat: if you try this with plug-ins in a workstation, you may have to compensate for some additional latency of the compressor in the sidechain path.
Lining up the pieces
That brings us to another issue that has received some attention of late. Now that people are working in DAWs, where tracks can be slid around with great ease, it occurred to some that the signal from the overhead mics is, naturally, delayed with respect to the close mics.
Some people find that sliding the overheads ahead a little, visually matching the transients with the earlier signals from the individual mics, provides a tighter, snappier, and sometimes fuller sound. Others, however, feel that this loses some of the sense of space of the recording (though room mics can impart more of this). If you have the chance, it may be worth experimenting.
The last word
Well, that’s about all we have room for. While recording the drums is a complex undertaking, it’s also a hell of a lot of fun. Sadly, it’s also becoming something of a lost art, with the prevalence of drum samples, loops, and plug-ins; but even so, there’s still nothing like the sound of a real kit being slammed by a real player, and for that we can all be glad!