The basics of recording electric guitar for just about anyone
By Michael Schulze
In this article I will talk about doing something that was once unthinkable: placing a microphone only inches away from a powerful amplifier to record an electric guitar. In the mid-1960s and earlier, it was thought by many recording engineers that placing a mic so close to something so loud would result in damage to the mic. It was also thought by many that listening to the music being played by some electric guitar players would result in widespread debauchery, and time has proven that assumption to be absolutely true. However, we now know that most modern microphones can handle the sound pressure levels at the front of the amp with aplomb, and this placement has become a big part of the sound of popular music.
The mics
Before we go any further, let’s consider the microphone that will be subjected to this amoral sonic barrage. There are two main categories of microphones: dynamics and condensers. Dynamic mics are further subdivided into two subcategories: moving-coil dynamics and ribbon dynamics.
The ever-popular Shure SM57 is a very familiar example of a moving-coil dynamic microphone. It has a disc-shaped diaphragm of tightly stretched plastic, usually Mylar. A coil of wire is attached to the back of the diaphragm. When sound waves vibrate the diaphragm, this coil wiggles back and forth inside the field of a magnet inside the body of the mic. This causes current to flow in the coil, and this current appears as a voltage at the output connector.
Moving-coil dynamic mics are simple, rugged, and inexpensive. The combination of the diaphragm and coil has a relatively high mass compared to the magnitude of the sound energy that is moving it, so these mics can handle very high sound-pressure levels and will roll off extremely high frequencies a bit. These two attributes help fatten up the sound of an electric guitar amp! These mics usually have a boost in the upper midrange (2000–7000 Hz) which adds brightness and bite.
Ribbon dynamic mics have a very thin piece of metallic ribbon stretched within the field of a permanent magnet. The principle is the same: sound moves the ribbon back and forth within the magnetic field and this causes current to flow through the ribbon. Modern ribbon mics typically have a smoother, more extended high-frequency response than moving-coil dynamics and can handle high sound-pressure levels. The frequency response in the upper midrange is usually very flat, so most ribbon mics will sound warmer and fatter than moving-coil dynamics.
Condenser microphones have a very thin plastic diaphragm that is coated with metal (usually gold). The diaphragm vibrates very close to a metal back plate. An electric charge is applied between the diaphragm and the back plate, which makes electrical current flow in and out of the diaphragm as it moves closer to and farther from the back plate. This tiny current is amplified by an internal circuit. The whole shebang is powered either by a battery, or with phantom power from your mic preamp, or with an external power-supply box in the case of a vacuum-tube condenser mic.
Condenser mics are more sensitive than dynamics and have a frequency response that is usually more extended on the high and low end. You can place them close to loud amps but the sound is usually better a foot or more away. More on that later in this article.
Condenser mics with a diaphragm measuring 1 inch or more in diameter are referred to as “large-diaphragm” mics, and those with a smaller diameter (1/2″ to 3/4″) are called “small-diaphragm” mics. Large-diaphragm condensers generally sound best close to a sound source and small-diaphragm condensers are more often used when the mic needs to be farther from the source, as is the case with drum overheads or distant mics for classical recording.
The amp
The first thing you should do is sit with the amp facing right at your head while you adjust the volume and tone controls for the best sound. If the amp is not facing right at your head you will not hear all the highs and you might set up the amp sounding too bright. Also remember that the sound of the amp changes at different volume levels. Take some time to get things sounding great before you reach for your microphones.

Figure 1
Any guitar amp will have one or more loudspeakers. Examine the amp carefully to determine exactly where the circular speakers are behind the protective grille cloth. If the amp has more than one speaker, you should have the guitarist play at a reasonable but non-injurious volume while you place your ear close enough to listen to each speaker individually. You may find that the speakers sound different due to age or damage. Once you have identified which speaker to use, locate its exact center. You may want to stick a small piece of tape on the grille cloth as a reference.
Most engineers will start by placing a moving-coil dynamic mic about an inch from the grille cloth, pointing right at the amp near the center of the speaker. The sound is brightest at the center, and gets gradually darker and warmer as you move out towards the edge of the speaker. In the center of the speaker, you will see a smaller circular cover that protects the voice coil within. I usually start by placing a Shure SM57 right at the edge of this smaller circle where I find the sound has a good balance of highs and lows.
The SM57 is a directional microphone with a cardioid polar pattern. All directional mics have some degree of proximity effect, which means they will give you stronger lows the closer you place them to the sound source. By moving closer and farther from the amp and closer and farther from the center of the speaker, you will find a wide range of tones. Hit Record and move that mic around in search of tonal nirvana! You might end up anywhere from 1 to 12 inches from the amp depending on how much low end you want, and closer to or farther from the center depending on how much high end you want. With my trusty SM57 I usually end up 3 or 4 inches away, at the edge of the voice coil.
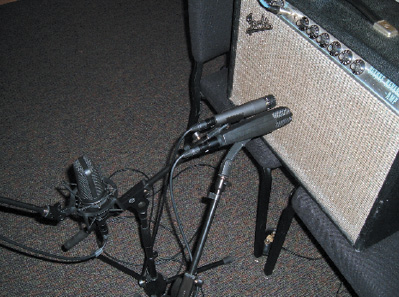
You will find that the SM57 gives you nice crispy highs, an aggressive and forward high midrange, and tight, clean lows without much extreme low bass. The Sennheiser MD421 is another very popular dynamic mic that will give you a noticeably extended and beefy low end with less crispiness on top. Figure 1 shows both mics positioned close to an amp; we discuss multiple-mic technique in detail below.
You might also reach for the Sennheiser e609 (a remake of the classic MD 409) or the e906. Both of these mics were designed for guitar amps and have a similar sound to the MD421. If you have access to a ribbon mic like the Royer R-101 or the Cascade Fat Head, you will find that these mics will give you a thick, warm sound, sometimes too dark but sometimes just right.

Figure 2
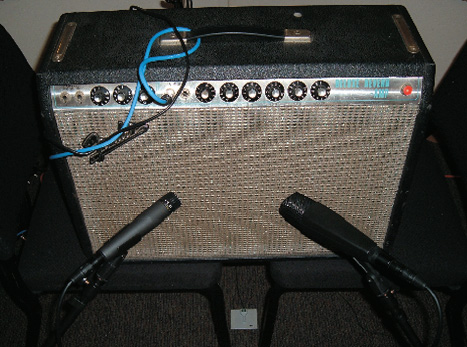
Try every dynamic you have! Also try turning them at an angle instead of pointing right at the speaker. You will probably find that this lessens the highs and lows, giving a more compact and midrange-oriented sound. (See Figure 2.) Once you get the golden tone, why not take a few pictures of the placement and the settings of the knobs on the amp? That way you can duplicate your setup quickly next time.
Condenser mics will usually sound more open and clear on guitar amps. You will see them placed right up near the grille, but most condensers are not designed to handle the high sound pressure here. You might find that the mic puts out too much signal and you have to turn your preamp gain all the way down. The signal might be distorting at the mic’s internal amplifier, or you might be slamming the sensitive diaphragm with too much raw awesomeness.
However, at a distance of one foot or more these mics can really open up and sound fantastic, with a depth and realism that sounds different from the tight, dense midrange punch of a close dynamic. If you are recording clean, clear, sparkly sounds from the amp, try a large-diaphragm condenser about a foot away. Experiment with distance, center versus edge placement, and angling the mic just as I described for the dynamics. See Figure 1 again and note the more distant condenser mic, in this case an Audio-Technica AT4050.
Mix it up!
Placing more than one mic on your amp can take your sound to a whole new level. Combining the different sonic characteristics of multiple mics can create a complexity of tone that seems somehow greater than the sum of its parts. Try a bright, crispy SM57 combined with the extended low end of an MD421 as shown in Figure 1 or the thick creamy midrange of a Royer R-101. Try a dark, fat ribbon up close combined with a condenser a foot or more away. Try combining three or four mics and see what happens!
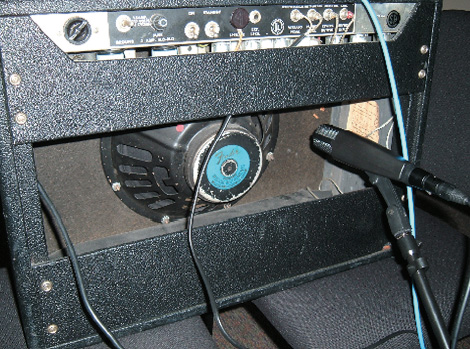
You can even place a mic at the back of an open-back cabinet, where you will find a surprisingly thumpy low end that you can mix in with your other mics. Make sure to reverse the polarity of this mic on your preamp or in your DAW, because the speaker is pulling away from this mic while it is pushing toward the front mics. If you do not reverse polarity, you will probably get a thin rather than a fat tone. See Figure 3 for a Sennheiser MD421 in this role.

Figure 3
When placing multiple mics on the amp it is important to consider the effect of their different distances. If you record two mics at different distances, perhaps an SM57 one inch from the grille and a condenser a foot away, you can zoom in on the waveforms in your DAW and clearly see that the distant mic picks up the sound later than the close mic. When you mix these two signals together, the resulting phase differences will result in alteration of the sound. Try it yourself. Record your guitarist sustaining a nice fat power chord and slowly move one mic closer and farther while another mic remains stationary. Pan both tracks to exactly the same place and listen to the result. You will probably hear drastic changes in tone. You can look at this as an unwanted extra variable to be removed, or as a useful technique to be exploited!
You can time-align your tracks by delaying the close mic so that it matches the time arrival at the distant mic. To do this, drag the track with the close mic to the right in your DAW so the waveforms line up, or figure out exactly how many samples or milliseconds of delay will accomplish the same thing and use a plug-in. This technique usually results in the fullest, most solid and realistic tone, and allows you to place each mic exactly where it sounds best and combine the mics with very predictable results.
However, you might find some killer tones by taking advantage of the sonic coloration that results from not time-aligning your tracks. If you like scooped, hollow, altered-sounding guitar sounds, then have at it without time-aligning. Are you a fan of a band called Tool? ‘Nuff said. However, you owe it to yourself to try time-aligning. You may be quite surprised at the solidity and lifelike sound quality you can get.
Roomy interiors
Let’s wake the neighbors! If you are lucky enough to have a decent-sounding room, you might want to try adding some room sound to your tracks. Take your amp and set that puppy up in the largest room you have, or even an unfinished basement or garage. Stick the usual assortment of close mics on it and add a mic a few feet away, preferably a condenser. The farther away that mic gets, the more ambient room sound you can mix in. This can add life to the sound, or you can use it as an effect to make the guitar sound increasingly distant. Be sure to try time-aligning the close mics to this distant one to see if you like the result better.
You might also point the distant mic away from the amp, aimed at a reflective wall, so that you pick up only the sound of the room to mix with your close sound. This can result in a sound that is even more ambient yet more clear. You can get the same effect by placing a mic with a figure-8 polar pattern somewhere in front of the amp but facing sideways so that you get sound reflections off the walls but no direct sound from the amp. This can be a great trick when your amp has to be in a very small room or even a closet.
You might also try a stereo pair of small-diaphragm condensers anywhere from 6 to 10 feet from the amp. Try them pointing at the amp or pointing away from the amp at the opposite wall. If they point at the amp you probably want to time-align the close mics to the distant pair. However, if they point away from the amp, they pick up a signal that is more dissimilar from the close mics and you may prefer the sound without time-aligning.
The more the merrier
I’ve presented many options here, and combining all these techniques can give you an infinite array of sounds! Lately I have been doing lots of reamping, which involves sending a recorded guitar track back through your amp so you can record it again. This is a great way to get your tracks recorded, then go to a great room and spend lots of time experimenting with all these crazy ideas in search of that Holy Grail tone. You’ll find articles on the topic in this online library. Rock on!


