
The space, the gear and throwing DARDTs
By Paul Vnuk Jr.
Even if you have not heard an Atmos mix yet, you have probably heard about Atmos. Perhaps you are curious about this (or any) immersive format and dying to dive in. If this is you, over the next few months, I invite you to join me in my journey of setting up and learning to mix in this exciting new format.
What is Atmos?
Dolby Atmos is an immersive audio format developed by Dolby Laboratories. Immersive audio is an evolution of what we used to know as surround sound. Where most surround formats projected sound around you in a horizontal plane, immersive audio also places sound on a vertical plane for a more three-dimensional sonic experience.
Other formats besides Dolby Atmos include Sony 360 Reality Audio, Auro-3D,
Ambisonics and Eclipsa Audio. There is also binaural audio that translates the immersive experience into headphones. The most well known currently is Apple Spatial Audio.
Dolby Atmos, usually referred to simply as Atmos, is currently the “Kleenex” or “Pro Tools” of immersive audio. Its dominant market presence means you will find the most direct support for third-party audio interfaces, speakers, plugins and DAW integration.
Young and Growing
To quote producer, engineer and Dolby Atmos advisory board member Will Kennedy’s April 2024 Fade Out, “…even though it might feel like we’ve been hearing about immersive music for quite a while now, we are still in the very early days.”
Although Atmos has been used in films and movie theaters for over a decade, its use in professional and consumer audio is less than five years old, and it has only become a “thing” in the past two or three years.
I can think of very few technological advances that have caught on so quickly. DAWs and plugins took well over a decade before they became “the way we all worked.” While popular, 5.1 for audio never gained ubiquitous mass appeal. Quad, SACD, Super Bit Mapping, HDCD and DVD Audio all came and went, and even stereo took a full 35 years before it was the dominant music-listening format.
By contrast, Atmos has already been stealthily assimilated into our music-listening experience via soundbars, pod and puck-like home streaming speakers, earbuds and headphones. It is also making its way into automobiles and other devices. Translation: we don’t need to do much to adopt it on the consumer level—it’s already here, in less than 3–5 years!
The Technical
In technical terms, Quad in the 1970s consisted of four speakers, and 5.1—the most common surround setup introduced in the early 1990s—consisted of five speakers (left, right, center, left-rear and right-rear) plus a subwoofer for the LFE (low-frequency effects) channel.
To mix in Atmos requires that you add a pair of side speakers and four overhead speakers. This is annotated as 7.1.4. These numbers equate to the number of surrounding speakers, followed by the number of subwoofers, and then the number of overhead/height/top speakers.
Atmos stands to be more successful than past surround offerings because it isn’t a “channel based” system like stereo, or 5.1, where a specific number of speakers is required for correct playback—two for stereo or six for 5.1, for example.
Atmos is an “object based” system where up to 128 objects can be assigned to one or multiple tracks. Each object’s audio is then printed as part of the deliverable file, along with corresponding metadata for pan position, level, etc. Don’t worry if this doesn’t make sense just yet; we will dig into it more as I wrap my head around the concept in a future installment.
The takeaway here is that an object based system, in this case Atmos, is scalable. A mix done on a 7.1.4 system can properly scale down to 5.1 surround, or binaural, or up to 9.1.6, or even to a 64-speaker movie theater system. The Dolby Renderer software allows us, as mixers ,to control the way these fold-downs happen (see Will Kennedy’s Meet the Dolby Renderer in the June 2023 issue).
Another reason for the success of Atmos is consistency. Setting up an Atmos system begins with a set of Dolby-specified guidelines for speaker placement. You can read their guidelines, and work it out yourself, or Dolby provides a very handy tool called the Dolby Atmos Room Design Tool (DARDT). The DARDT can be a vital starting point for those new to Atmos.
The Start of My Atmos Journey
When I attended the Summer NAMM show in Nashville, TN, in July 2021, the number one question I was asked was, “What are your thoughts on Atmos?”
At that time, I was skeptical—maybe it was a fad, the new 5.1 perhaps. I was curious—having sound all around and above sounds intriguing, nifty even. I was also scared—I still feel like I am just getting happy with my stereo mixes, and now you want me to learn a new format?
I was also aware of the opposing arguments of naysayers, such as, “Who will ever really hear a true Atmos mix? I can’t afford it, and it’s just a ‘deep-state’ ploy to sell more gear.”
Despite my initial misgivings, fears and gnashing of teeth, I was lucky to have a few friends in the industry who helped me move past my concerns. I interviewed engineers and producers, young and old, who were taking the plunge into immersive audio, and along with their initial mistakes, learning curve and frustrations, I also heard their joy and excitement.
I visited some impressive full-scale Atmos rooms and experienced true immersive audio for myself. Listening to a well-crafted immersive audio mix on high-end monitors in a spacious, purpose-designed Dolby Atmos studio is incredibly humbling.
I Want to Mix in Atmos…Now What?
So now, I want to mix in Atmos, but I am still anxious about it. Why? My excuses include the following: my professional mix room is on the small side, and I often track in my control room, where there is no extra room. My home studio/office is even smaller.
Then there is the expense. Depending on your choice, you will need at least 12 speakers, a multi-channel interface with audio outputs equal to your speaker count, and a way to control, manage and correct them. Without even trying, you could be talking about a startup cost of $20,000 to $60,000 of professional-grade gear.
Atmos for All?
Most people will read that and think, I’m out! And therein lies the problem. After more than 20 years of $200 interfaces, $500 microphones, $500 or less studio monitors and inexpensive software, anyone can record music at a reasonable cost. If we want Atmos and Immersive audio to succeed, we can’t go back to it being strictly the domain of just elite audio professionals in big-budget rooms. Those things are necessary, but there needs to be “entry-level” Atmos options as well.
If we can figure out how to put Dolby Atmos playback in a car, then it has to be possible to set up a workable Atmos mixing system built upon smaller speakers in smaller spaces, such as a bedroom, basement or attic.
Will there be compromises? Yes, of course, but compromises, workarounds, alternate solutions and innovation have been part of recording and mixing since day one. Also, just like a person tracking and mixing on a humble setup in a bedroom is not going to yield the same subjective quality as a full-scale professional facility, it will be the same with immersive audio, and the two paradigms should hopefully be able to coexist at some point.
With all of that in mind, welcome to my first steps into the world of Atmos. Let’s begin.
My Room
I have two spaces to create and enjoy music. One is Moss Garden Music, a professional, treated mix room located in a converted office space in a large pole barn in the farm fields and forests of southeast Wisconsin where I have been recording and mixing music for almost two decades…and this is not where I am setting up an Atmos system.
My other space is in the basement of my 1920s Midwest home. My family moved here a little over three years ago, and this space has become my home office, as well as a small editing suite for music, podcasts and video. It’s also where I like to kick back, relax and listen to music. When I decided to transition it from office to editing suite, I engaged the services of the folks at GIK Acoustics to help me treat the space as best I could with appropriate absorption and bass trapping.
I chronicled the initial transformation in my review of the GIK DecoShapes panels in the March 2022 issue.

My Home Studio/Office Pretreatment
Intelligent Compromise Is Key
You are going to read the word compromise many times throughout this series. Unless you are fortunate enough to be able to build a studio from scratch or remodel your home to accommodate a full-fledged professionally designed space, any of us taking the DIY route of re-purposing a space in our homes, be it a garage, a spare bedroom, a nook in your attic or a corner of your basement, will become intimately familiar with the word.
If you are lucky and blessed to have a literal little corner of the world to craft your art in, you are blessed, and your job is to make it work. You will compromise when doing so, and it’s ok!
Were People Shorter in the 1920s?
My home space is a 1920s Midwest basement and all that implies—uneven, pockmarked concrete floors, brick (not cinderblock) outer walls that are now braced with steel beams to keep them straight.
My little corner of the basement is roughly 7′ 5″ wide and 8′ 7″ deep, although it opens into a larger lounge/bar area separated by a small brick load-bearing pillar. The ceiling measures 6’11” in height, which is the distance between the 7″ tall ceiling joists, leaving an actual standing height of just 6′ 4″. Additionally, there are numerous electrical, water and gas pipes running to and fro, all added haphazardly over the past hundred years.
My desk sits between two framed drywall inner walls, one containing a door that opens into the space and hides the electrical panel and city water supply. In front of and just above me is a glass block window, and of course, nothing is centered, even or squared.
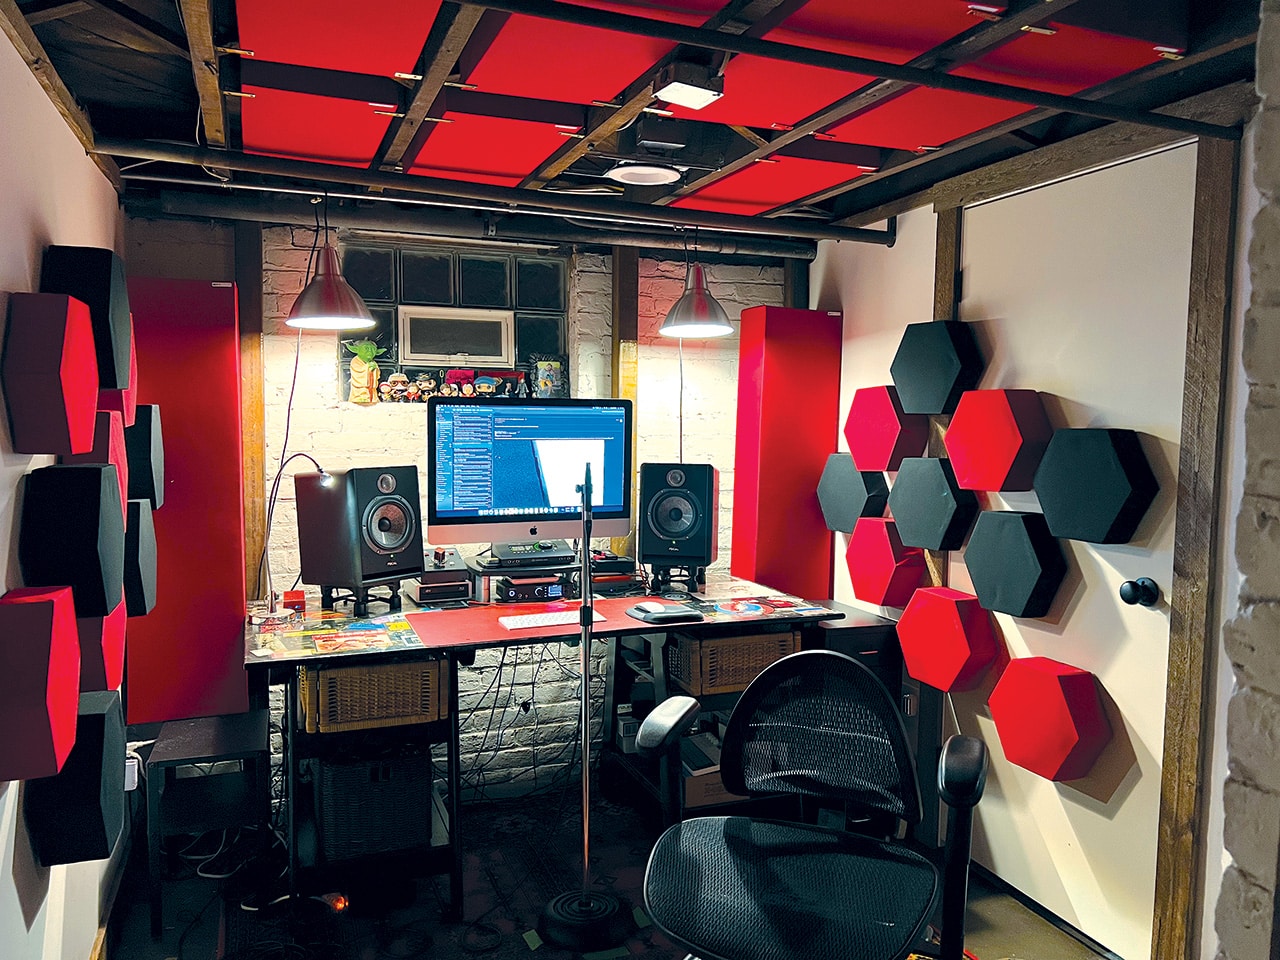
Treatments
To avoid side reflections, I used 20 GIK DecoShape Hexagon 12″ (w) point-to-point acoustic panels at a mix of 3″ and 4″ depths. On each side of my desk, you will see two 12″ (w) x 48″ (t) GIK Monster bass traps with a thickness of 7.3125″.
Overhead is where the first compromise occured. I needed custom panels to fit between the joists in order to maintain ceiling height. Due to some pipes and an overhead light, the coverage is not equal—these issues will rear their head again when I begin to hang and position my height speakers. For this treatment, we used five 12″ (w) x 28″ (t) GIK 244 panels stuffed between the joists. I originally wanted six panels, but the light was in the way.
When comparing before-and-after measurements of the space done with the free REW software (roomeqwizard.com) and a cheap measurement mic, there was significant “filling in” of a 100 Hz null, reduction of a prominent 150 Hz low-end peak and significant reduction of reflections across the board.
According to GIK, acoustician John Dykstra, ”Overall, the outcome is good…considering we’re talking about just 50 sq. ft. of treatment, these are pretty great results.”
Here is what the room looked like post-treatment in 2022.
My Gear
My current gear selection includes an RME ADI-2 DAC for high–fidelity mixing and listening. In my opinion, it’s one of the best DACs money can buy, and it also supports DSD. I also have a Universal Audio Apollo x4 (and UAD-2 Octo Satellite) for tracking, mixing and podcasting. These are connected to a Radial Nuance Select monitor controller, which runs to my Focal Solo 6 BE monitors and a Focal Sub 6 subwoofer. I also use a DACS Purity headphone amp to indulge my hi-fi lossless music enjoyment.
I highlight my current gear roster to point out that none of it will factor in or be repurposed into my Dolby Atmos setup.
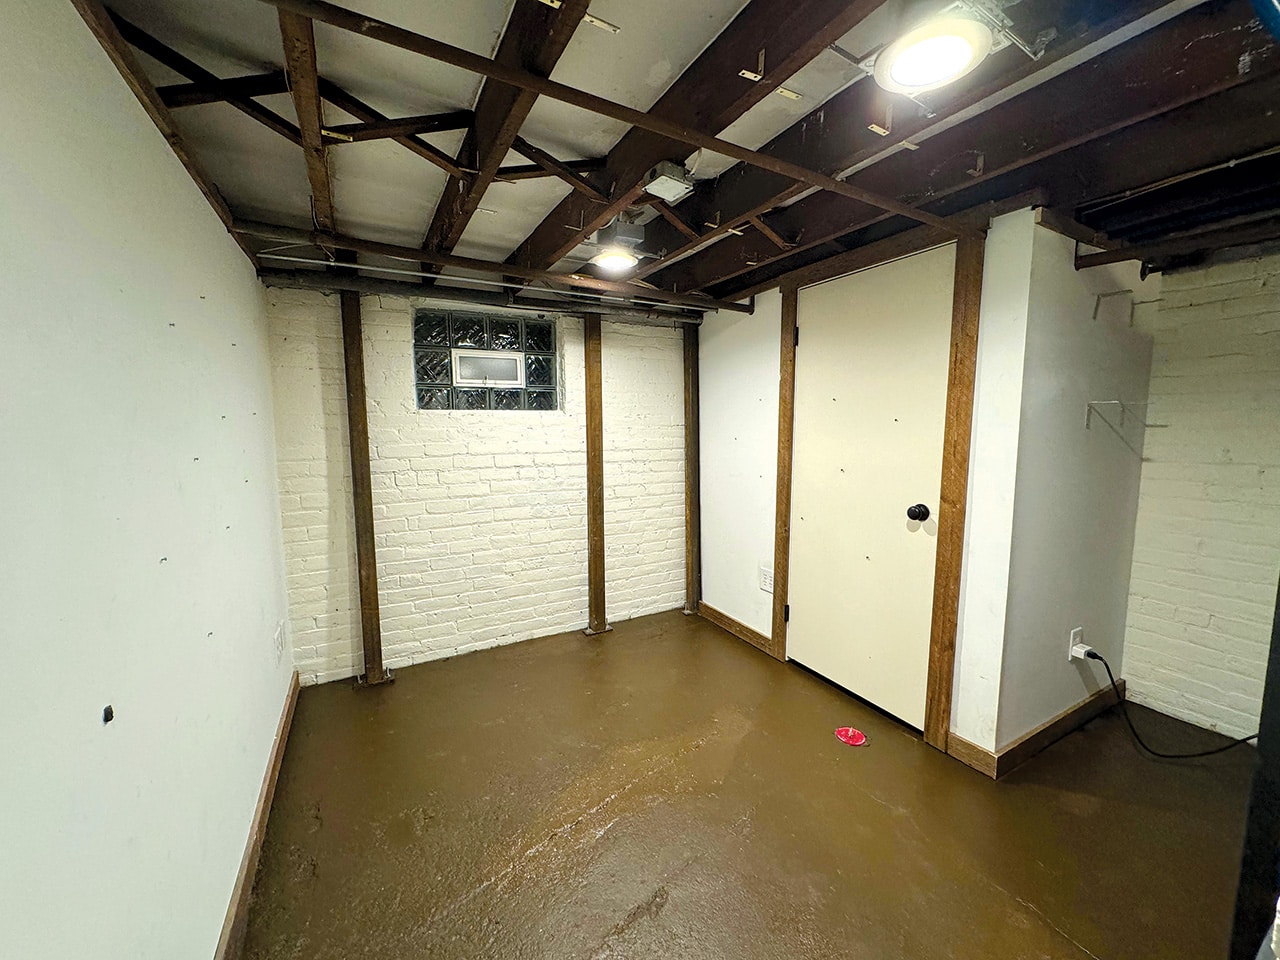
The Raw studio.
Pre-Atmos Considerations
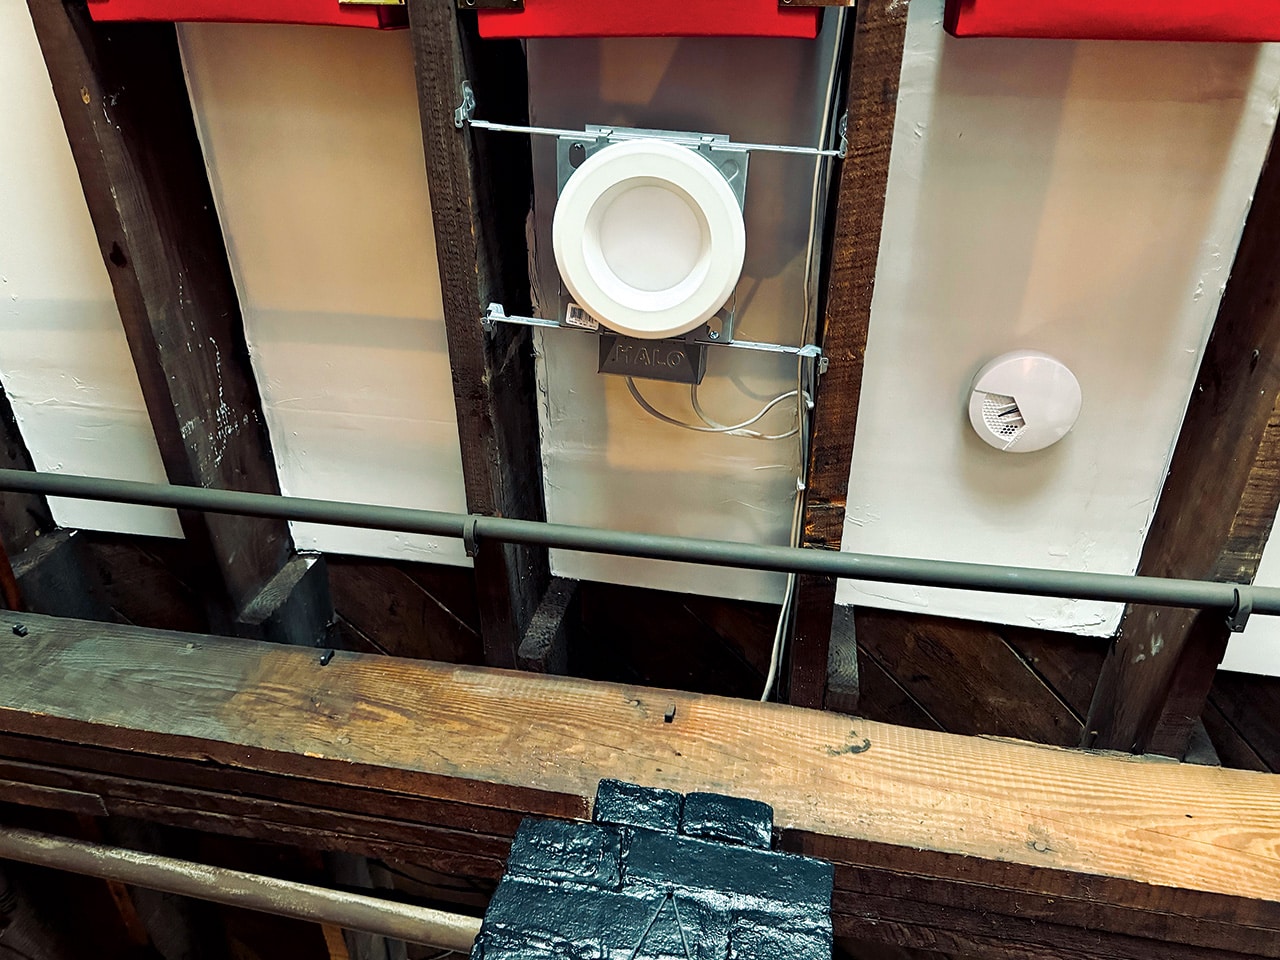
Close-up of the added drywall, light fixture and a pipe to work around, followed by the room ready for gear.
Earlier last year, I made a few more changes to my space in anticipation of a possible Atmos future. Structurally, we removed everything from the room, scraped the aging brick walls and resealed and painted them. My wife, who is a professional interior decorator, and I—well, mostly my wife—screwed strips of drywall into the subfloor and drywalled in all of the gross spots where the wood framing of the house sits on the brick foundation, which was stuffed with old insulation and 100 years of…I don’t want to know, actually.
This was done preemptively to provide more anchoring points for the height speakers and to prevent dust from the subfloor from falling on my head and gear. I like to think it offers a bit of added “isolation,” but I would guess that its effects are minor. Nonetheless, the space looks much cleaner, and there is less of a draft in the winter.
The final addition to the space was a new purpose-designed production desk—my old desk pictured earlier is a rehabbed rummage sale find. The new desk is a Wavebone Headquarter Studio Workstation that I bought on the recommendation of our Associate Editor Alex Hawley, who loves his.
The new desk will have a bearing on my Atmos setup in a few ways. While most of my current interfaces and audio gear are of the desktop variety, the Headquarter offers three 2-space 19″ rack bays. I am certain any Atmos interface I choose will have a 19″ rackmount device or a pair of side-by-side half rack options.
The desk also has a “bridge” for my speaker and computer monitors, a cable management tray, and an 88-key keyboard pull-out drawer. Currently, my home space hosts many of my synths and keyboards. For space reasons, those will be migrating back to my main studio, but the pull-out drawer lets me still have access to keys and MIDI via a Native Instruments S88 Mk3. A MIDI keyboard in the space is still essential, and I am very much looking forward to exploring the Sound Particles SkyDust 3D polysonic synth in true Atmos.

The refreshed room ready for gear.
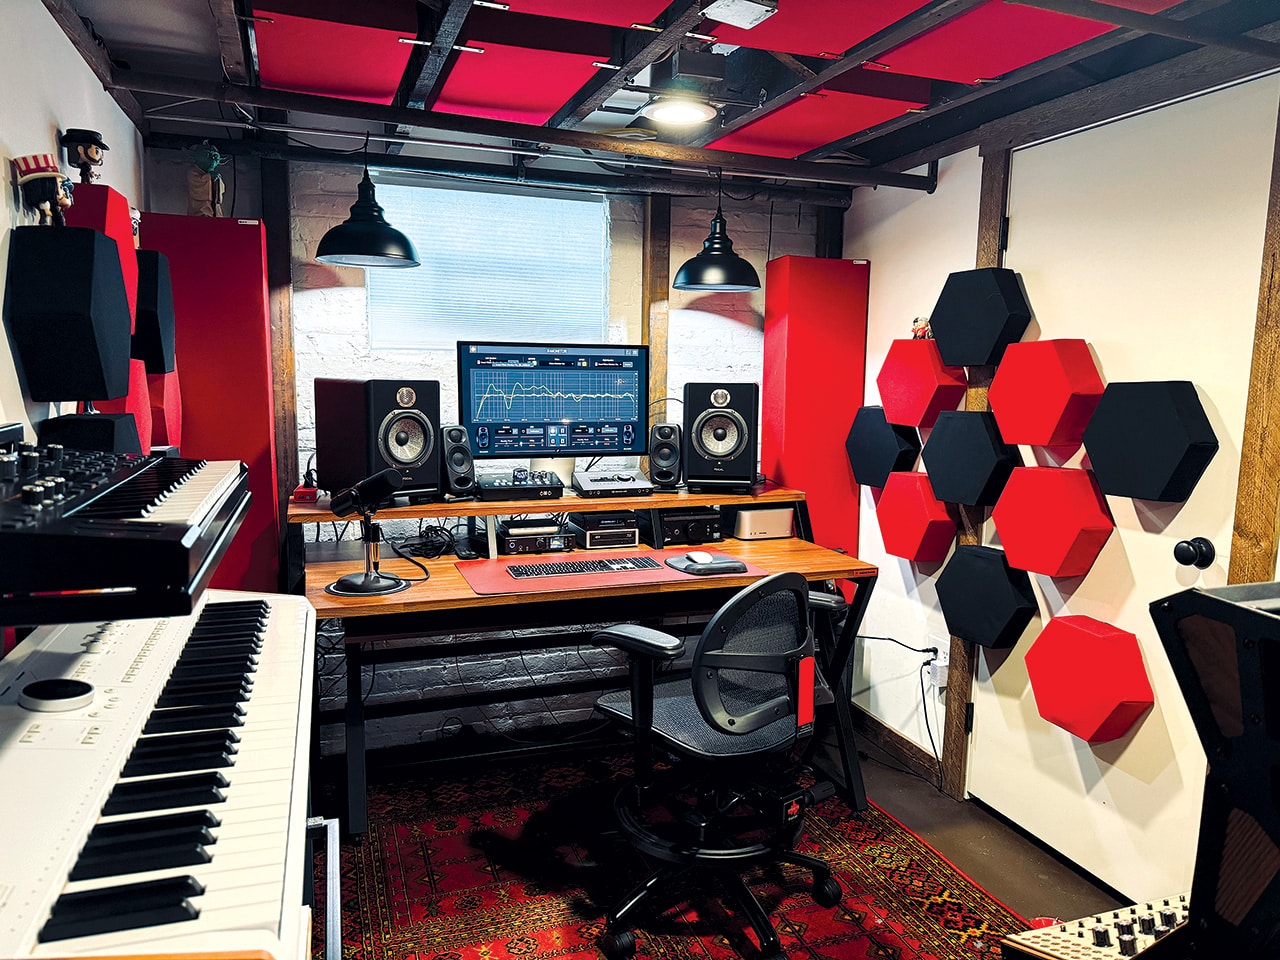
Refreshed room with new desk and keys.
Picking Atmos Gear
When choosing gear for a Dolby Atmos system, the two main considerations are what speakers you want to go with and what interface can accommodate your needs.
Unlike the wild-west days of 5.1 surround, where often a set of really nice studio mains would be combined with some smaller, less robust second-tier rear and center speakers, Atmos is a bit more regimented. It’s best that each speaker in the array is the same brand, and if different sizes are considered, they should at least belong to the same series, like 8″ head-level speakers with 6″ height options, for instance.
If I were to build around my Focal Solo6 speakers, which I’m sure would sound great, it would cost $13,000 out of the gate, as each speaker is $1,500 and I would need to add nine more.
So far, most of the best-sounding Atmos rooms I have been in have been based around Genelec One series monitors. These monitors are not only are great for Atmos due to their linear phase accurate sound, but thanks to their Genelec Loudspeaker Manager (GLM) control and room integration software, performing the necessary Dolby Atmos room correction is a breeze. Consequently, I would love a Genelec SAM/GLM-based Atmos setup.
I have also heard some great Atmos rooms using Ocean Way, Meyer Sound, Dynaudio, PMC and Danley Sound Labs (which is what I use for main monitoring at Moss Garden Music). However, with all of these options, the cost can approach and even exceed the $100k mark in some cases.
My goal for my Atmos setup is to be as affordable as possible. Ideally, I would love to stay under $10,000 in total. Now, $10,000 is not insignificant for any audio engineer. However, considering what most Atmos systems can cost, anything under $10,000 is pretty darn affordable.
Size Matters
While theoretically, I could use 6″ monitors, like my Solo6, they would take up too much room, especially overhead. When you are used to having your computer screen in front of you, you also need to consider where to put your center speaker.
So, let’s look at some available 3″ and 4″ monitor options. Although not GLM/SAM enabled, Genelec has the downright petite 8010A (which I considered pretty hard). You will also find similar size options from PreSonus, Kali Audio, Yamaha, ADAM, Neumann, KRK, JBL and a host of others.
I would caution to avoid smaller monitors that share and distribute power and audio between stereo pairs with a jumper cable. Perhaps you could figure out how to make such a configuration work, but that’s a compromise I am not willing to explore at this juncture. You also need to make sure that your chosen selection is available in singles and not just pairs, as you will need a single center speaker.
Throwing DARDTs
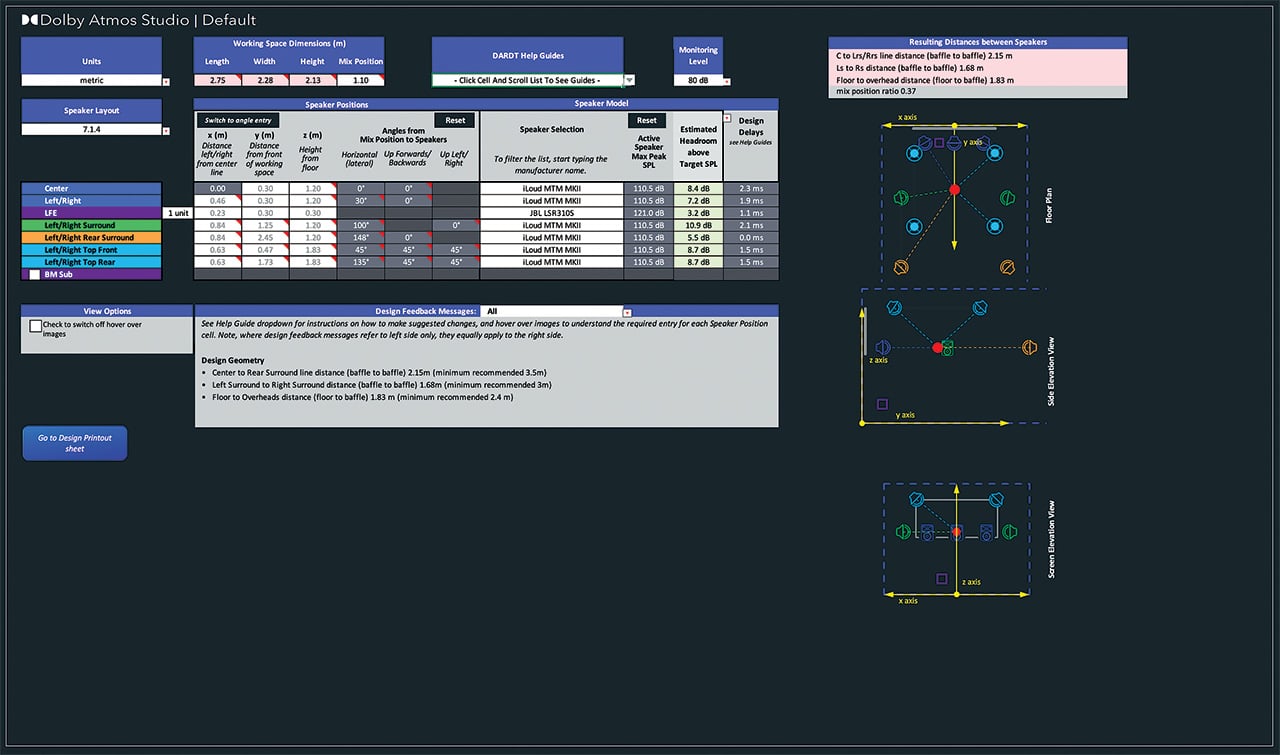 While your initial speaker choice may begin with brand preference, it will not end there. Here’s another great reason to use the Dolby Atmos DARDT mentioned earlier.
The DARDT is a macro-enabled Microsoft Excel-based spreadsheet. We will dig more into it next month, but here is a sneak peek of what it looks like.
In the simplest of terms, you enter your room dimensions (metric is much easier than feet and inches) along with the distance of your listening position from the front wall. It then calculates where each monitor should be placed (height, distance and angle). Sounds easy, right?
In conjunction with that information, you also need to enter your monitor choice to see if it is powerful enough to handle the headroom and levels needed for Dolby Atmos. You may be surprised and a bit disappointed that some of your initial choices may not make the cut. For instance, while my beloved Focal Sub6 subwoofer is great for 2.1 listening, it is sadly underpowered for my Atmos needs, even in my small space.
For now, that is as far as we will go with the DARDT. Just note that it is for Excel only and will not work in Mac Numbers or Google Sheets.
My Atmos Speaker Choice
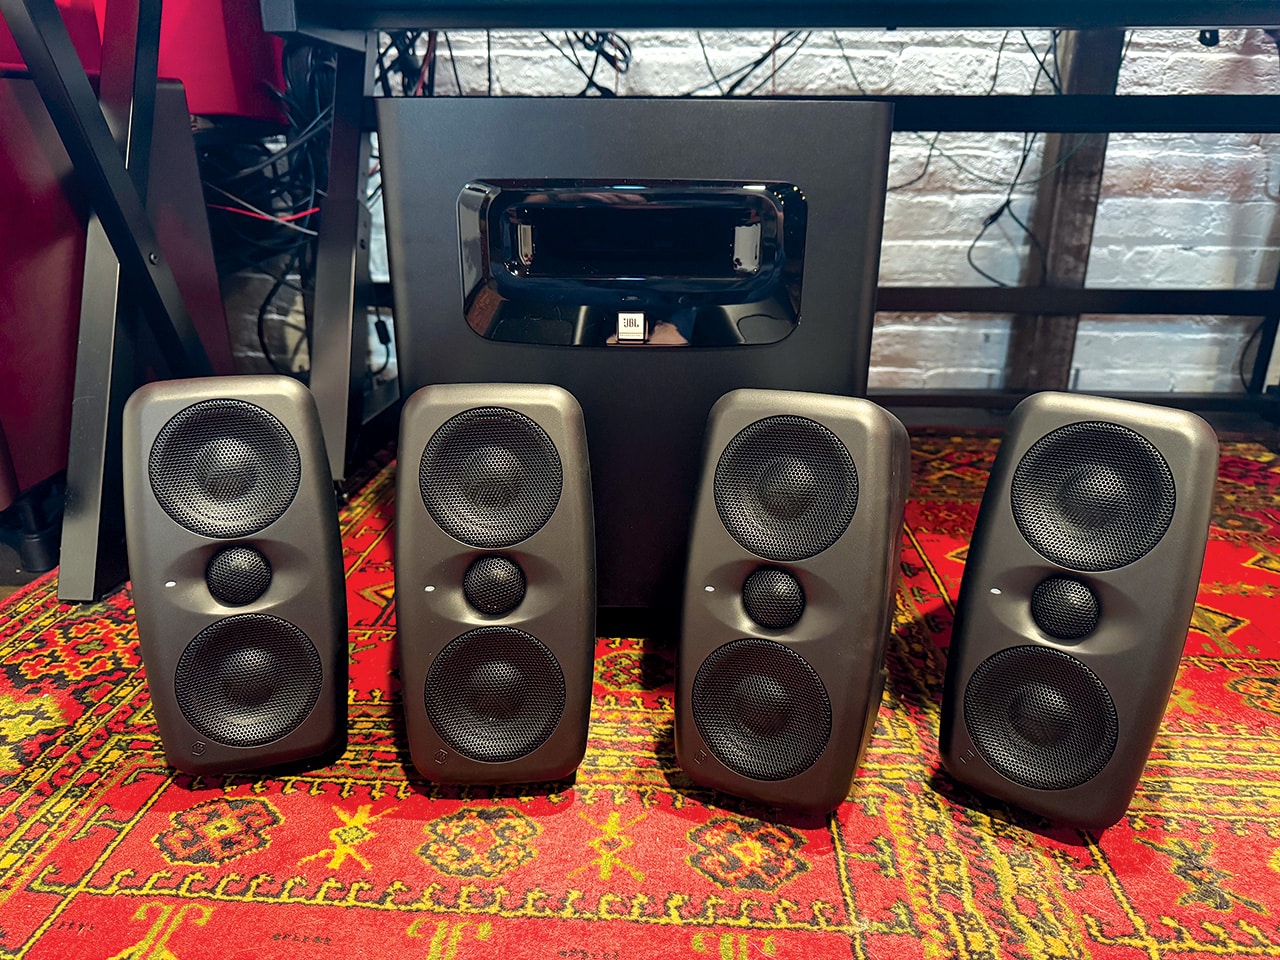
The JBL LSR310S and four iLoud MTM MKII speakers ready for install.
Ultimately, I went with an immersive bundle of the IK Multimedia iLoud MTM MKII monitors and a JBL LSR310S 10” Powered Studio Subwoofer.
In the December issue, I reviewed the IK Multimedia iLoud Micro Monitor Pro. It impressed me so much that I now use it as a high-quality secondary check monitor in my main studio (see my video review on our YouTube Page: youtu.be/IW24W_hInrA).
This was followed by a review of the MTM MKII last month in our February issue. It would be cheeky to say that I loved it so much in stereo that I thought, why not nine more? But there is more than a hint of truth in that. It also specs perfectly for my size room in the DARDT, so win-win. Check out last month’s review for the full specs and details, but I found them to be a great choice for Atmos for the following reasons.
First, the size and price They will fit quite wonderfully in my space and have a great sleek profile. The $3,999 price for the full nine-speaker bundle is one of the most affordable Atmos options I have found so far—if you don’t count the $2,799 iLoud Micro Monitor Pro Immersive Bundle.
Above size and price is their sound. As my review, and darn near everyone I know who has heard them, points out, these speakers sound so much bigger and fuller than their size implies. They are also very accurate directional point source monitors and come with their own iLoud ARC room correction capabilities. The microphone is included.
Finally, IK offers a line of bespoke mounting brackets for them, and they can also be mounted on a mic stand.
Finally, my choice of the JBL LSR310S was also motivated by its $399 price, the fact that it also specs out wonderfully in the DARDT, and its also the sub that IK recommended when I asked. It’s also IK had set up in its MTM MKII Atmos array at last Fall’s AES Show. It had a well-balanced thump and great integration on the show floor, so I can’t wait to hear it in my room—stay tuned.
That’s a lot of information, and I really hope you enjoy walking through this process of discovery as I take my first steps into the world of Atmos mixing. Next time, we will install, position and wire up our speakers.
Special thanks to Will Kennedy for his knowledge, advice and corrections in this article.
For Your Studio