
A successful recording songwriter’s path to a productive home studio.
By Mike Robinson
The feeling of being in a room in perfect silence, not preoccupied with potential mistakes, brings a type of focus that I rarely find on stage. It could be the most meditative experience a music-maker can have if it weren’t for the two very distracting factors: time and money.
I was sixteen the first time I ever set foot in a real recording studio. I was the guitarist for the Colorado Conservatory for Jazz Arts “Messengers” band and we were making an album of student compositions. I was in the main room with the horn section and I vividly remember how good everything sounded in the room. I even remember being surprised at how my talking voice sounded in my own head!
My amp was in an isolated box with a Royer R-121 ribbon mic on it. The engineer told me to turn off my compression pedal so he could compress the signal in mixing. At the time, his statement upset the teenager in me that “knew what his tone was,” but once I heard what an 1176 sounded like, I didn’t care for my BOSS CS-2 anymore. The whole experience fascinated me. Needless to say, I caught a bug that week that I’ll certainly die with: I love recording music!
The Problem
After such a magical experience as a teenager, it likely comes as no surprise that I pushed for my band in college to track our debut record in the best studio we could afford. We ran a crowdfunding campaign, asked everyone we knew, strategically pleaded on social media, and finally raised the money we needed. With hours of rehearsals, excited pride, and our newfound budget in tow, we were off to make a real record!
We arrived to the studio for our first day of tracking, surrounded by much of the beautiful equipment I had been wooed with during my teenage experience, and were thrilled to have “made it” in a sense. But as the day progressed, there was an underlying problem we couldn’t ignore—time was running out. Even after our meticulous preparation and successful fundraising, we just couldn’t get comfortable enough to get great takes, knowing that the clock was ticking. Our focus was gone.
We ended up putting the record out anyway, and even though the tones were exactly what we were going for, the playing sounded hurried and unfocused. I completely blame the pressure of the clock and the budget. Since then, I’ve had the privilege to play on numerous records in expensive recording studios, that were similarly rushed due to budget constraints and scheduling. In that setting, I’ve felt like it’s been an uphill battle to get takes that feel relaxed, grooving, and musical.
When it came time to start my first project as a leader, I had saved up enough money for a few days in a decent studio, I figured, “That’s just the way records are supposed to be made.” I could afford a middle-of-the-road space, and hopefully be in there with enough time to avoid the pressure of the clock…
The solution
While I was demoing the songs at home, little by little I began finding the tones I was looking for. I delayed going into the studio in favor of calling my engineer friends for tips on getting better sounds at home. “What type of mic placements should I use for acoustic guitar?” “Where in my room should I place my amp?”
At the time, all I had was a budget converter and an Audio-Technica AT4040 that I mostly used to mic a bluegrass band on stage. After borrowing mics from friends and asking enough questions, it hit me. What if my recording budget wasn’t for this record alone? It could be the starting budget for my own equipment to record any future record at my leisure. After all, the clock is friendlier when you have keys to the studio.
This opened up a rabbit hole in my life that I may never get out of. For about the same outlay as I had originally budgeted for studio time at one of the nicer studios in Brooklyn, I built my own modest but wonderful-sounding bedroom rig.
First steps
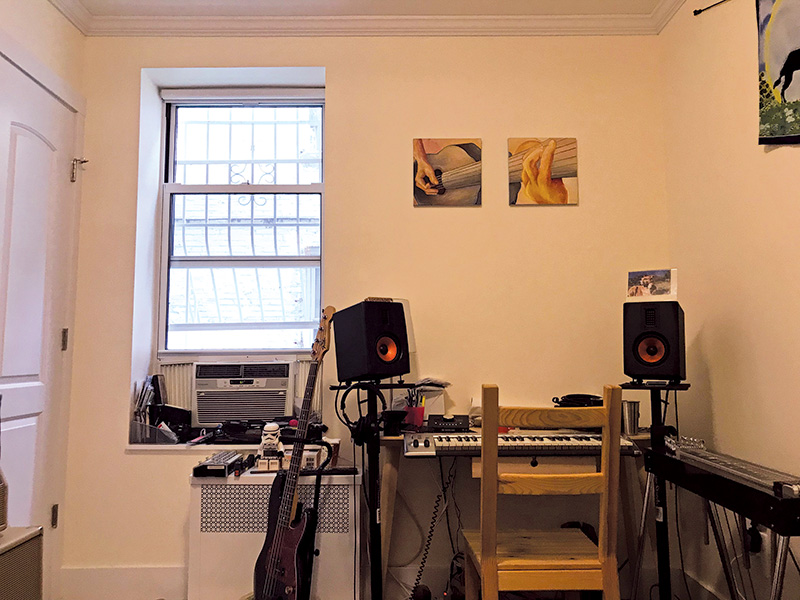
Bedroom: First Steps Photo 1.
I began by upgrading my converter to a Universal Audio Apollo Twin DUO. I was naturally drawn to the UA interfaces because of their plug-ins. Even the free plug-ins bundled with the interface were a giant leap forward from the stock Logic plug-ins I had been using. With the Apollo Twin feeding Logic, I had a solid DAW setup.
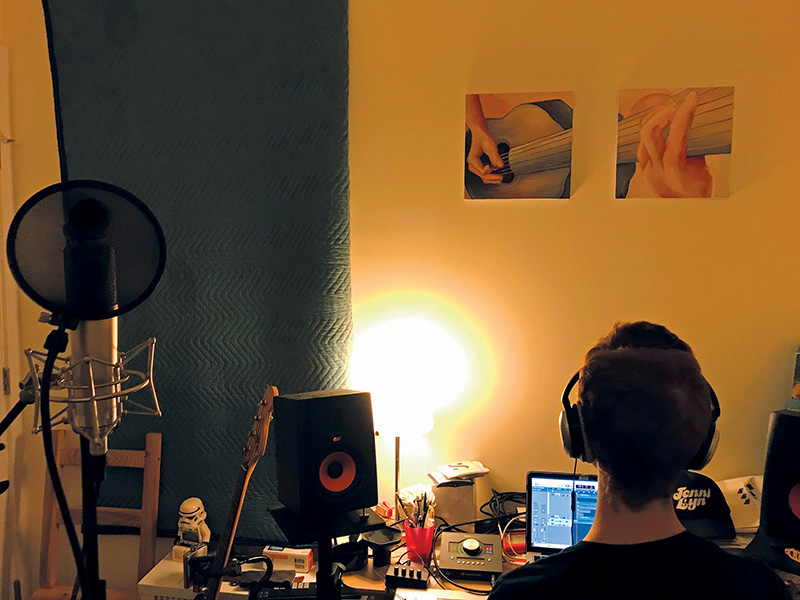
Bedroom: Frist Steps Photo 2.
Now to make decisions about microphones! I fortunately had a working relationship with the kind folks at Peluso Microphone Company through a band I’d toured with previously. Having enjoyed recording on their gear before, I decided to invest in a stereo pair of the P-84 small-diaphragm condensers and one P-87 large-diaphragm condenser. With those three microphones and a roommate’s beyerdynamic M 88, I was able to record almost my entire record from my bedroom desk.
I purchased a pair of introductory-level monitors—the ESI Audio uniK 05—and a 4-channel headphone amp so multiple people could track and monitor simultaneously. Then it was time to look at what I could do with my bedroom itself in terms of acoustics. Photos 1 and 2 give an idea of my room at this point; note the packing blanket hung to cover the window when I worked.
Hearing and space
I began researching room treatment, and consulted with the great humans at GIK Acoustics to determine the best options for treating my space. They told me my room setup was not ideal; there were certain things I couldn’t possibly fix because of the doors, my window, and the fact that it’s a bedroom.
Beyond that, though, my mix spot was off to one side, so they said I was missing the symmetry that they would recommend. After a few hours of rearranging furniture, I was able to center my listening position on one wall of the room, now opposite where I’d previously been set up.
They also told me that within my budget I would not be perfectly treating my room—for a room of these dimensions (11’7″ x 8’8″ with an 8’5″ ceiling), it would probably cost in the neighborhood of $3000 to apply the treatments required to create a room with “absolute accuracy.” In the end, compromising slightly to remain within budget, I purchased eight of their 244 Bass Traps. While not enough to fully treat my room, they were enough to make a serious change for the better!
GIK’s instructions on placement of the bass traps were very clear and concise. The main point was to be able to adjust them in the moment, to find the most effective placement with my ears. I was to start with one panel on each side wall, at the point of first reflection, hung horizontally at ear level. I used a mirror on the wall to see where the speakers were from my desk chair, in order to find the reflection point on the wall (Photos 3a and 3b).
GIK also advised two panels on the ceiling at the first reflection point. After a few test runs, I decided to put one at an angle between the ceiling and the front wall above my monitors (Photos 4a and 4b). I placed the remaining panels behind the speakers on the front wall, and on the back wall above my bed (Photo 5—yep, that’s the same packing blanket covering the window).
Before hanging the panels, my room was apparently both bass-heavy and shrill. The midrange was lost, due to what I assume to be some canceled-out frequencies bouncing off the walls. There was also a little too much natural reverb, and a slight flutter echo on some of the more percussive sounds.
After adding the room treatments, I measured my speakers by recording them playing back pink noise with a mic at the sweet spot. I then compared the frequency response of the recording to a raw file of the pink noise. Taking into consideration the frequency response of the microphone I used, the results were wonderful—I now had a room that was equipped to make professional recordings.


Tracking
I proceeded to track the vast majority of the record in my room, slowly and carefully tracking each instrument at a time. I now had the flexibility to take my time, capturing the best sounding and feeling takes and making certain each arrangement fitted together naturally.
I was surprised at how good things sounded in this smaller space—I’d always thought a big room was needed to get things to sound real. The electric guitars and pedal steel were very true to the amp’s sound in the space; I was able to play with my distance from the amp and microphone to get more or less pick noise in the track.
The strings were all tracked in a corner between bass traps and a moving blanket, creating an even smaller sound environment than the center of my little bedroom. In the end they sounded lush and wide as if we had a nice church to track them in, but we also had the option to dry them all the way out for an intense close-up sound.
My producer and I settled on tracking my vocals through both the M 88 and the P-84. They were placed as close to each other as we could get them, to eliminate the possiblility of any phase issues. In mixing we ended up leaning towards the dynamic vibe of the M 88 and using the condenser for more of a color effect. We even panned it differently on one track, with a different reverb and echo, to get a wider image and depth. The acoustic guitars were tracked in stereo with the matched P-84s—usually doubled and panned wide, but sometimes pulled straight down the middle for a dry and intense focus. Sonically, the vocals and acoustic guitar tracks are what I’m most proud of in hindsight.
Having all the equipment I needed right at my desk enabled me to take my time and to step away from songs for a few days at a time, to regain perspective in a way simply not possible when on a studio’s clock. I had friends come over to gradually flesh out parts that I couldn’t track on my own (e.g. layered strings, background vocals) and could interact with them more directly than through a talkback microphone, ultimately making for more efficient sessions than would be possible in a multiroom studio.
Mixing and beyond
I started mixing myself, and although I got a product I was relatively happy with, I decided I would never do as good a job as someone who had been mixing for years. I went to my friend Charlie Van-Kirk and worked with him to finish mixing.
I was still very happy to have my room set up to check the mixes, and I ended up noticing things at home that I couldn’t hear in Charlie’s studio. The EQ was clearer to me in my own space, maybe because I was used to listening to records I know intimately on my setup. However, after doing a pink-noise frequency test, my listening setup in the room was objectively quite even on a frequency spectrum. Working together, we ended up with something that I was more happy with than I’d imagined I would be when starting out. After that, it was mastered by Philip Shaw Bova, and we had a record!
Final thoughts
Clevidence EP Cover.
Since completing the Clevidence EP, I have recorded guitar, banjo, pedal steel, violin, and voice for several other projects in the space. We recently did an whole record that was recorded entirely in my bedroom, with the exception of drums.
Of course I’m always looking for a few pieces of gear to take the space to the next level, but for now I am grateful for the setup I have. I think that this has been one of the most successful investments—and one of the most powerful learning experiences—of my career.
Mike Robinson’s Clevidence EP (cover shown below) should be in stores by the time you’re reading this. Learn more at mikerobinsonguitar.com. Check out the EP via mikerobinson.bandcamp.com/album/clevidence.