
Deeper Gear Considerations and Utilizing DARDT
By Paul Vnuk Jr.
Welcome back to part two of my ongoing series, chronicling my first steps into immersive audio and Dolby Atmos. In part one, published in the March 2025 issue, I offered a brief introduction to Dolby Atmos and immersive audio in general. Then, I detailed my journey from Atmos skepticism to Atmos-curious to, I guess, what you might call Atmos-committed.
My First Steps
Two big things to note about this series, which will appear over the rest of the year (and maybe beyond), are that despite being a professional live and studio engineer for pretty much my entire adult life, I am an absolute beginner when it comes to Atmos. In this series, I will try to cover my ignorance, mistakes, ah-ha moments and hopefully, my discoveries and triumphs.
Secondly, as it pertains to my space, gear choices, and Atmos setup, in many ways, I am “breaking the rules.”
While I am blessed with a professionally treated, well-equipped mix room and tracking space (Moss Garden Music), for reasons I covered last time, I am installing my Atmos setup in the basement of my 1920s Midwest home. This basement features uneven, pockmarked concrete floors, brick (not cinderblock) steel beam-braced outer walls, and low funky ceilings featuring over 100 years of add-as-you-go pipes, wires, conduit and more.
Over the past three-plus years, my “little corner of our basement” has served as my office, an editing suite and a listening lounge.
Like many modern-day musicians and engineers, I am repurposing the space I already have in my home. I am not doing any major construction, build-out, or professional design of a purpose-built immersive studio space. This also means that while Atmos on any level is not cheap, I am aspiring to make my initial immersive steps as affordable and easy as possible.
Please note that I had intended to move into placement and wiring this month. However, I felt it was important to dig a bit deeper into the specific gear considerations of Dolby Atmos and why I made my choices.
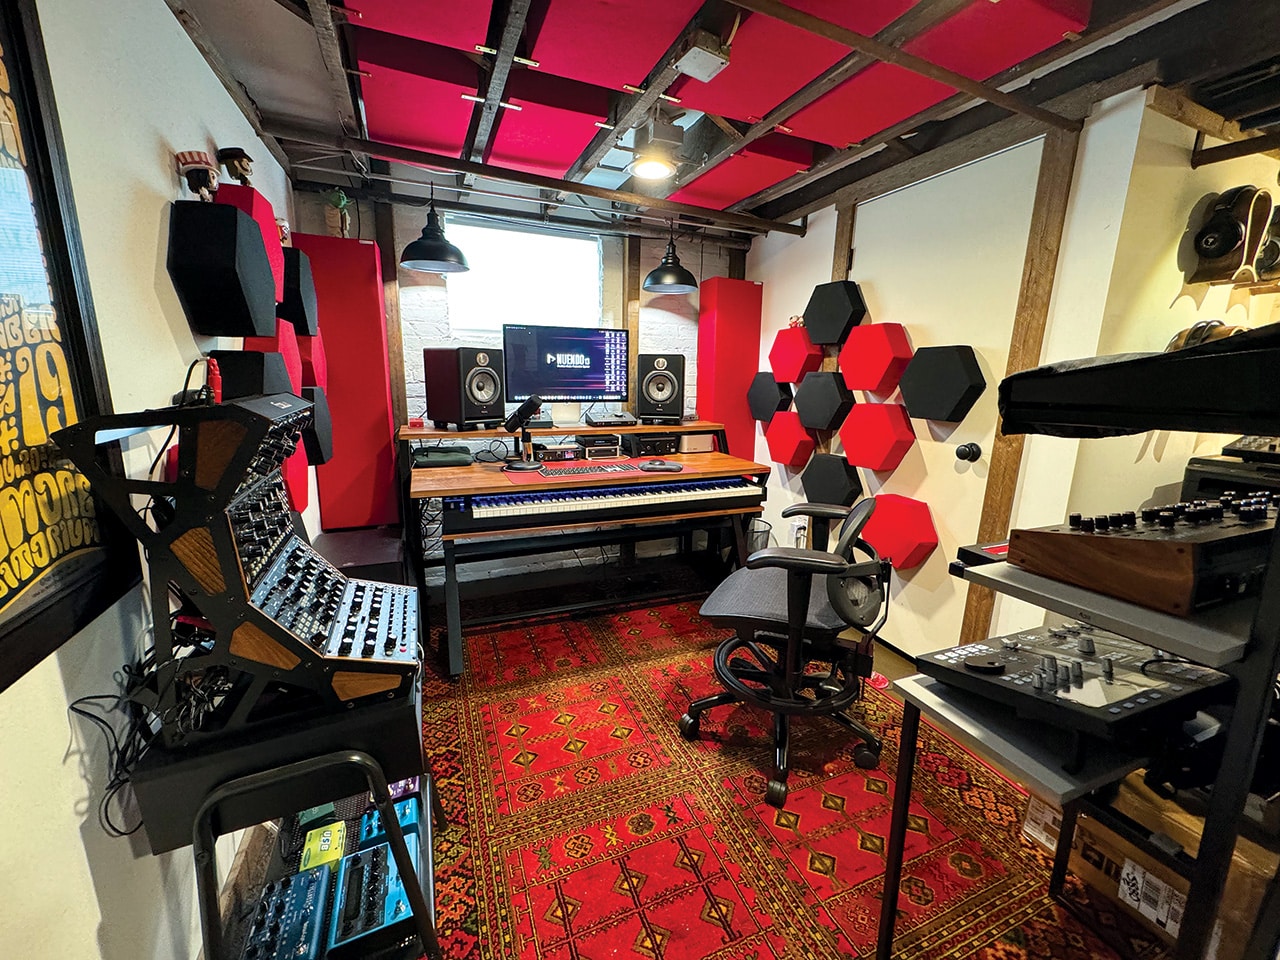
My Basement home studio pre-atmos
The Space
To recap, my home studio/office is roughly 7′ 5″ wide and 8′ 7″ deep. However, there is no rear wall—it opens into a larger lounge area separated by a small brick load-bearing pillar. The ceiling measures 6′ 11″ in height, between the 7″ high ceiling joists, leaving an actual standing height of just 6′ 4″.
My Headquarter™ Studio Workstation (wavebone.com) production desk sits between two framed drywall inner walls, one of which contains a door that opens outward into the space. This door hides the electrical panel and city water supply—an issue in my Atmos install.
In front of and just above me is a glass-block window. Nothing is centered, even or squared, and I already mentioned the maze of pipes I have had to work around.
Treat Your Room
The room has been treated with GIK Acoustics panels, with panel and placement advice courtesy of GIK acoustician John Dykstra. Currently and previously, the room employed 20 GIK DecoShapes Hexagon 12″ (w) acoustic panels (3″ and 4″ depths) for side reflections and general absorption. Bass is handled by two 12″ (w) x 48″ (t) GIK Monster Bass Traps with a thickness of 7.3125″ placed in the front corners of my mix position. For a cloud of sorts, I have five 12″ (w) x 28″ (t) GIK 244 panels stuffed between the joists like a drop ceiling in reverse.
So why am I recapping my previous treatment options? Because I had to rearrange and repurpose some of the panels to accommodate the new speaker setup. Two of the GIK 244 ceiling panels are now on my wall in the first reflection position, which allowed me to spread out the Deco Shapes. I will be ordering smaller, possibly custom-sized panels to fill the new spaces around the four ceiling speakers.
I have also decided to add a narrow 11.5 x 45.5 6″ GIK Impression Panel for the small brick pillar behind me—more on this as my treatment needs to develop.
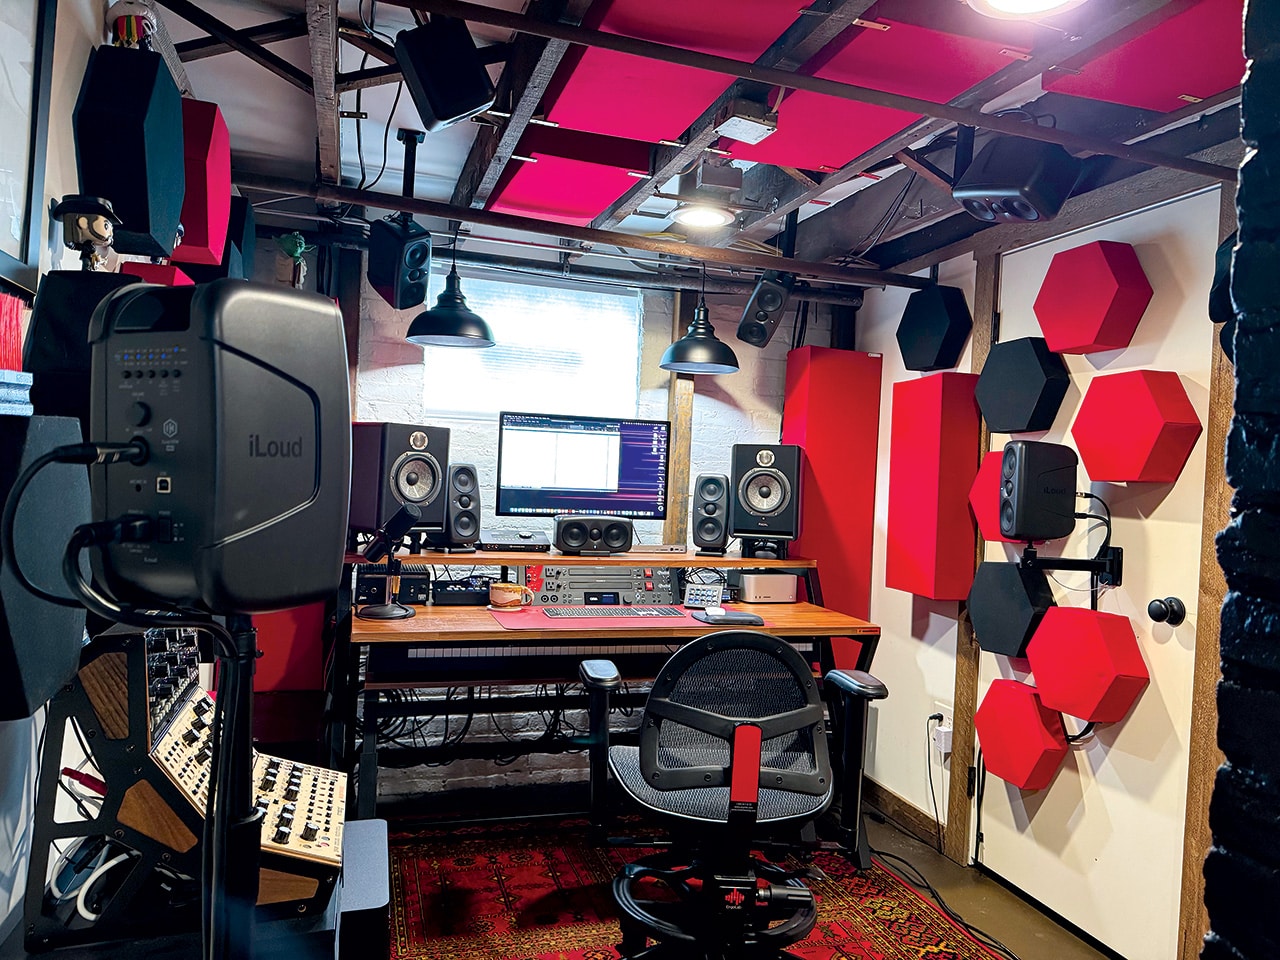
A sneak peek of the panels after the speaker install

iLoud MTM MKII speakers
Eleven Compact Speakers and the LFE (Sub)
Last time, I mentioned my speaker choices. Now, let’s dig deeper into the why.
Checking all three boxes—compact size, affordability and great sound—I decided upon an immersive bundle of IK Multimedia iLoud MTM MKII monitors (reviewed February 2025). After reviewing and using a stereo pair, I was impressed by their “fullness and surprisingly rich-sounding low-end bloom.” Most importantly, “they present as louder and fuller than they are.” This led me to add to the already substantial chorus of iLoud users uttering the oft-used phrase, “Physics defying.”
MTM is short for ‘midrange-tweeter-midrange’ and denotes the speakers’ symmetrical, over-under 3.5″ composite cellulose drivers and a 1″ tweeter design. The MTM MKII features a very directional point source design, which allows the speakers to be aimed at the listening position in a laser-focused way. This, combined with the speakers’ fullness at comfortable listening levels, should make for a great combination in immersive.
Another reason for my choice is that I find the small, narrow 10.39″ (t) x 5.12″ (w) x 6.3″ (d), 5.5 lbs. footprint of the MTM MKII perfect for my small space needs. Spoiler alert: they actually do a nice job of staying out of the way and not making me feel trapped in a cage of speakers.
Another big deal is that the MTM MKII employs the company’s ARC (automatic room correction) technology to compensate for the sound and placement of the monitors in my space, which, while treated, is far from perfect. Having heard what ARC was capable of in stereo in my rooms, I can’t wait to see how it fares in an immersive setup.
Finally, IK Multimedia offers an iLoud-specific iLoud Wall/Ceiling Bracket ($49.99) for mounting the MTM MKII monitors to the wall or ceiling.
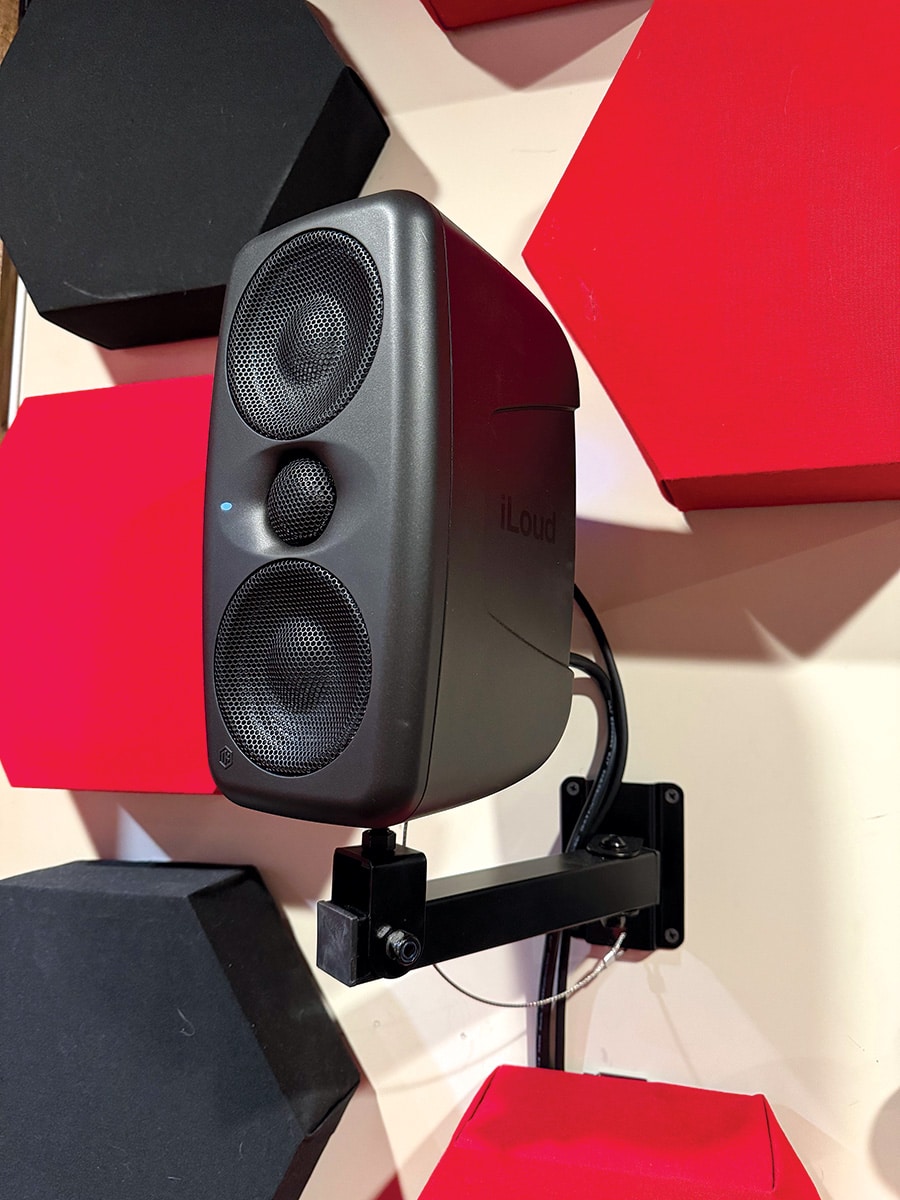
iLoud MTM MKII and the Wall or Ceiling Mounting Bracket
Immersive Bundle Options
IK offers the MTM MKII in an immersive 11-speaker bundle with an ARC MEMS measurement mic for $3,999 or in a special co-branded package with the new Apogee Symphony Studio 2×12 interface and four mounting brackets for $5,599.
While many full-scale Atmos speaker setups start in the $35,000 to $40,000 range and rise quickly from there, this makes either IK immersive bundle quite impressive when you consider that you have almost everything you need to get started.
Now, let’s dig into the almost part…
The Low End
IK Multimedia currently does not offer a subwoofer, which is necessary for the low-frequency extension (LFE) in a 7.1.4 Atmos configuration—the LFE (subwoofer) is the .1 part. With no shortage of subwoofers to choose from, size and price were at the forefront of my decision.
Initially, I hoped to repurpose my Focal Sub6, which is part of my 2.1 stereo setup, along with a pair of Focal Solo6 Be monitors. While I love the sound of this setup for editing and hi-fi listening, I learned—thanks to the Dolby Atmos Room Design Tool (DARDT; more on this in a moment)—that the Sub6 is underpowered for use in as the LFE channel in an Atmos setup.
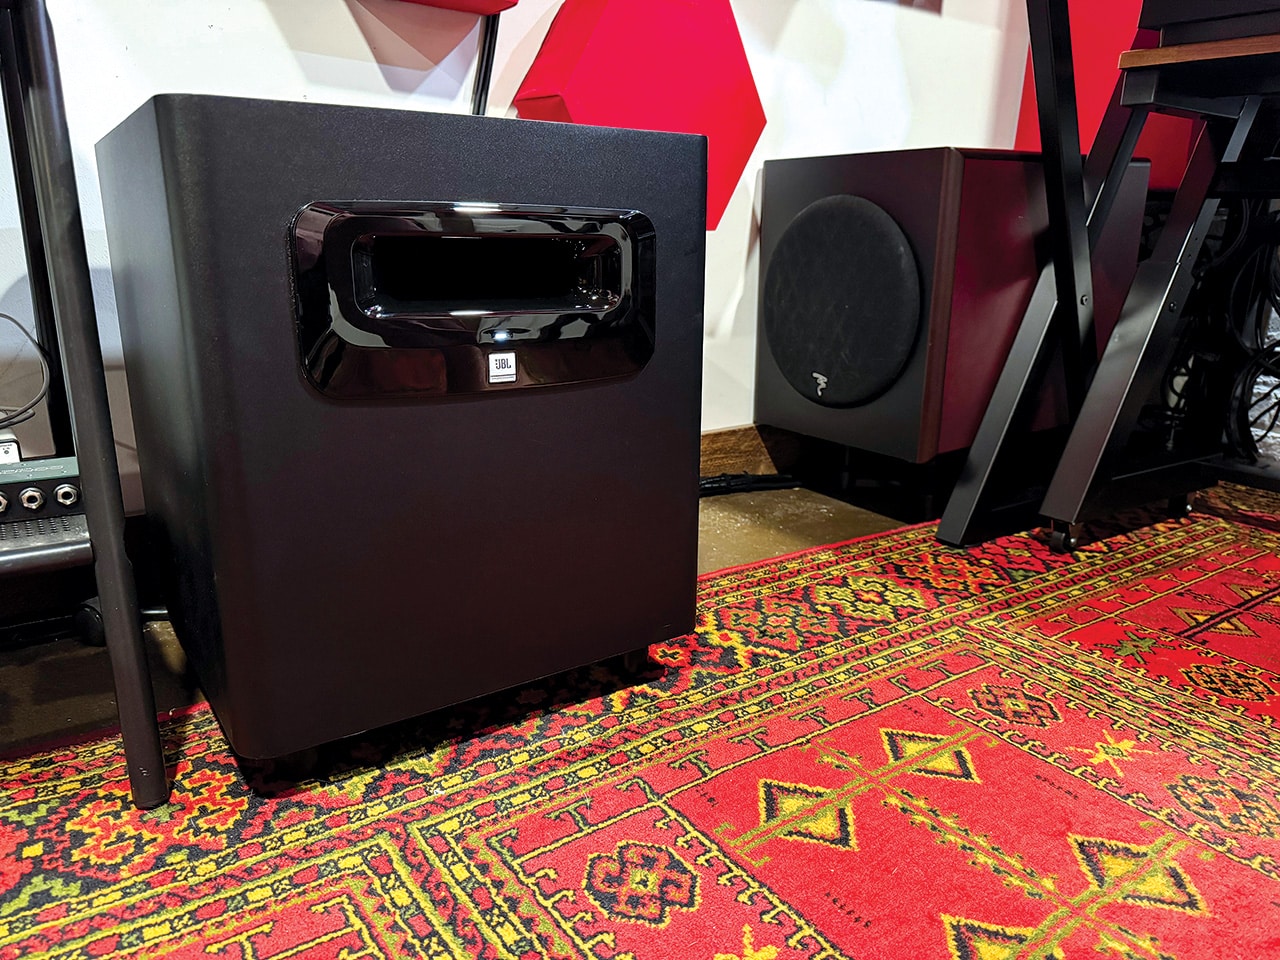
JBL LSR310S with Focal Sub6 in the Background
After some research, I chose the JBL LSR310S. This compact powered studio subwoofer has been a popular workhorse for almost a decade, paired with other popular JBL LSR active studio monitors or paired with third-party speaker options.
The LSR310S measures 17.65″ (t) x 15″ (w) x 15.65″ (d). It weighs 34.3 lbs. and features a 10” high-excursion, down-firing driver that puts out 200W of power with a maximum peak of 113dB. Designed to work in-line or on its own it offers both left and right balanced XLR and 1/4” inputs and XLR outs—for mono use, just choose a side.
It offers a selectable crossover with a choice of 80 Hz, Extended Low Frequency, or external, as well as a +4dBu/-10dbV input sensitivity and input attenuation.
Best of all, the JBL LSR310S meets the DARDT LFE specs perfectly, and it only costs $399.
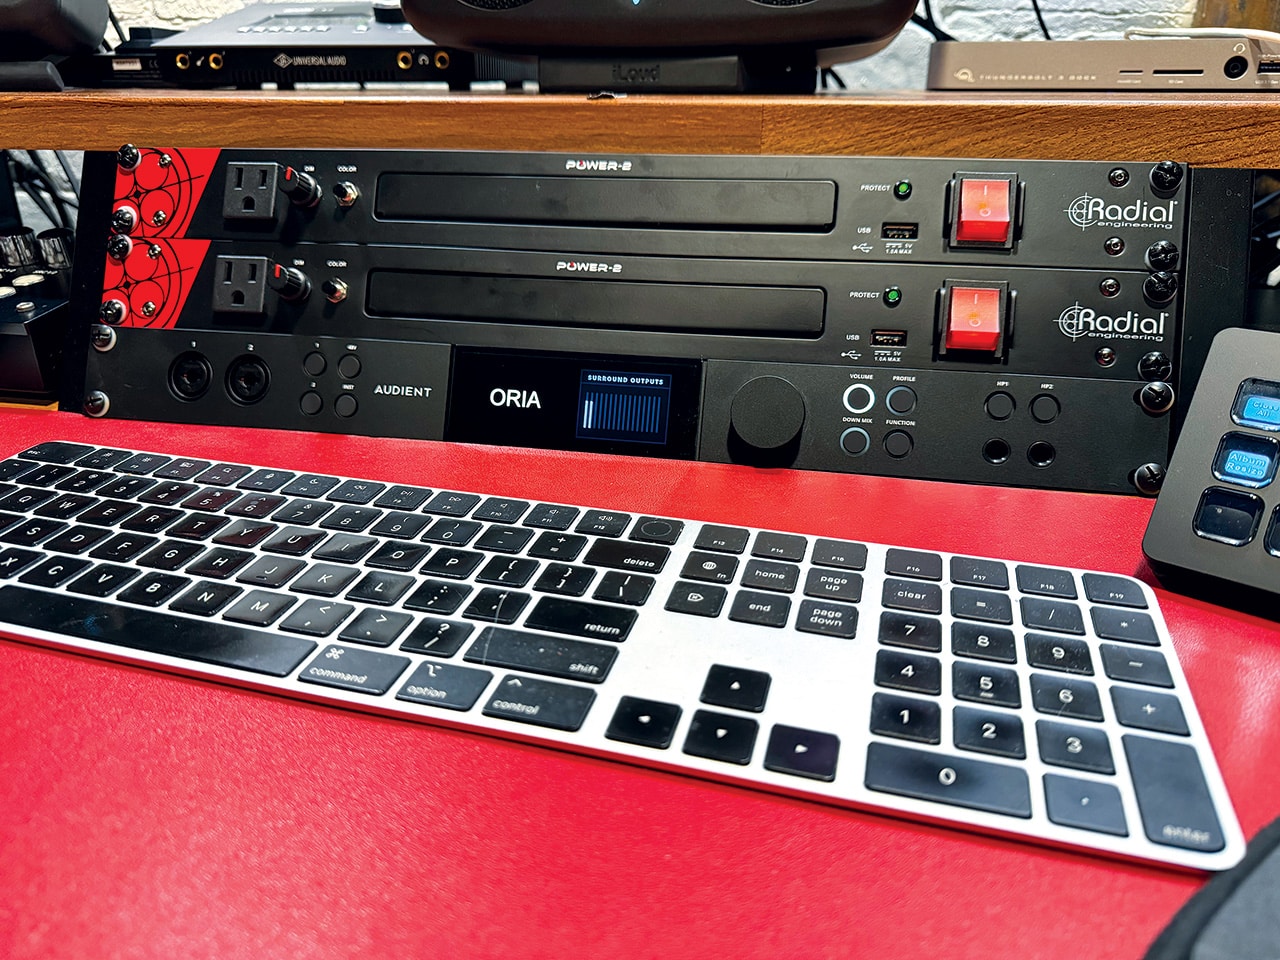
Audient ORIA
Atmos Interfaces
Unlike a typical audio interface, which usually offers a set of stereo L/R outs along with an occasional second set of outs for switching between multiple stereo monitors, a 7.1.4 Atmos array requires 12 audio outputs:
- Seven surround speakers (left, right, center, left side, right side, left rear, and right rear)
- One LFE (subwoofer)
- Four height speakers (left front overhead, right front overhead, left rear overhead, and right rear overhead)
Of course, you can also scale up to add wide surround speakers between the left and right front and side speakers, along with a pair of mid-overhead options if you choose. The point is, at the bare minimum, Atmos requires audio streams to be sent to 12 channels.
Most users have two options. If you have at least a four to eight-channel interface with an optional ADAT output, you can add an 8-channel ADAT expander like the Arturia AudioFuse X8 OUT ($299—reviewed November 2024). Otherwise, you will need a 16-channel interface.
Room Correction
Each speaker in an immersive setup (Atmos or otherwise) needs to be EQd and time-aligned. This is a must not only for time alignment but also, as Dolby Atmos expert Will Kennedy reminded me, “There’s no room on earth that you can put 12-16 speakers in that isn’t going to require some degree of EQ tuning to get it sounding right at the listening position.”
This used to be done in a stand-alone device such as the popular JBL Intonato ($3,600), but today, you can find both speakers and audio interfaces that facilitate the execution of the room correction process and the means to store the results internally.
On the speaker side, as mentioned, the iLoud MTM MKII monitors incorporate ARC room correction software. At the same time, the Genelec SAM (Smart Active Monitors) series uses that company’s proprietary GLM software. Another increasingly common option is offerings from Neumann, ADAM Audio, Barefoot Sound and others that incorporate and host the popular Sonarworks room correction process—arguably the original pioneer of third-party room correction software.
Another (possibly more cost-effective) option is that RME, Apogee, Universal Audio and Avid have begun to integrate Sonarworks into their audio interfaces.
Going one step further, a few companies are starting to design Atmos and immersive-specific interfaces with 2 input channels and 12 to 16 outputs, such as the Apogee Symphony Studio 2×12 ($1,999) mentioned above or the Audient ORIA ($2,699). The ORIA will be the first Atmos-capable interface I am testing out, and you can expect a full review of it in our next issue.
For now, it’s worth noting that the ORIA may be the most directly Atmos-specific interface on the market so far. It even includes a Sonarworks trial and measurement mic, and Audient has crafted its own interface app and more to make Atmos streaming/playback from an Apple Music subscription plug-and-play. I can’t wait to try it.
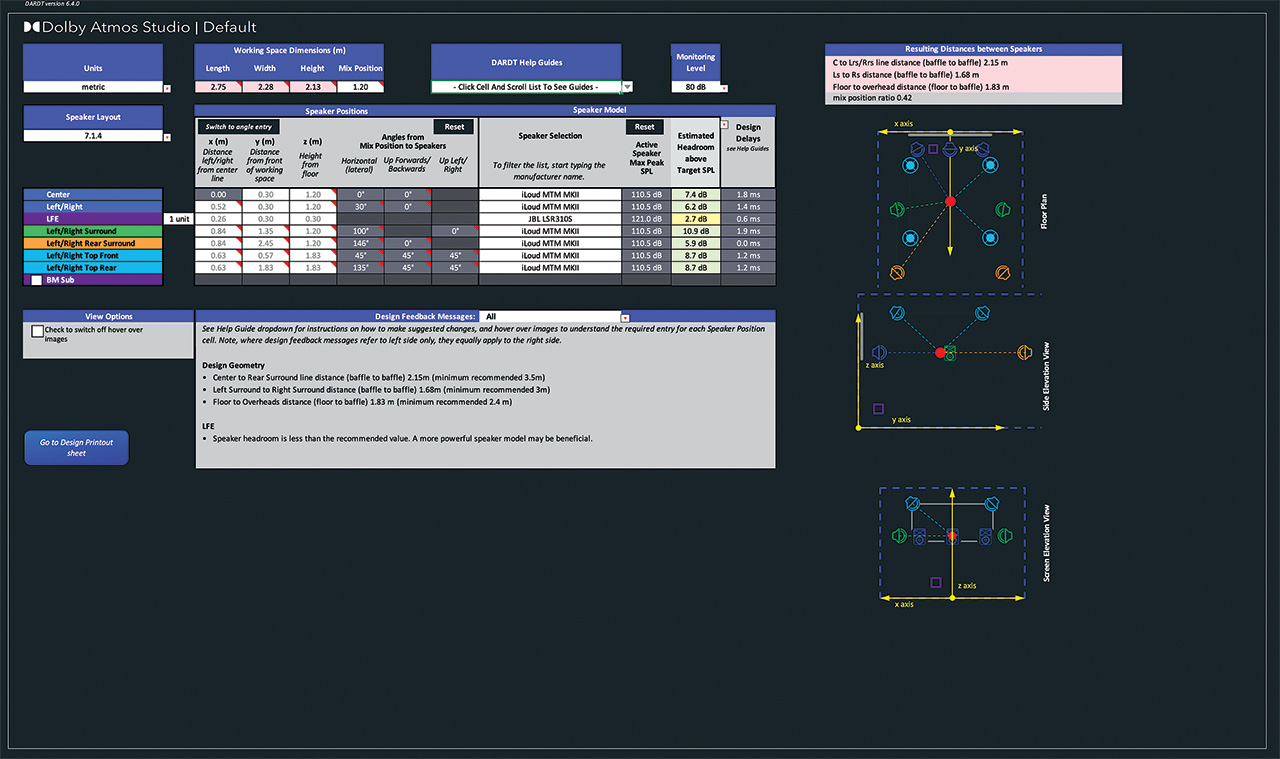
DARDT Main Screen
Time to Throw DARDTs
Before we connect all of the above, we need to know where and how to place our new collection of speakers.
So, where does each speaker go? Enter DARDT, a Microsoft Excel-based spreadsheet that makes use of special Dolby-created macros to suggest where to place and position your monitors based on your room dimensions and your position in the space.
Note that DARDT is Excel only; its macros will not work in Apple Numbers or Google Sheets. Thanks to DARDT, I now have a Microsoft 360 plan (he says sarcastically).
The first few times I opened and tried DARDT, I was more than a tad intimidated. But once you nose around and begin to input your data, it quickly becomes a handy tool to help you lay out your room and even make some gear decisions—which is why Dolby created it.
By the Numbers
To start, you need to choose a unit of measurement. I found metric to be preferable and more accurate than feet and inches. The only data you need to enter into DARDT is your studio dimensions, which, in my case, is 2.75m (l) x 2.28m (w) x 2.13m (h). You will see by the cells turning red that DARDT is laughing at me and telling me my room is smaller than recommended.
The next piece of information to enter is your mix position, which I originally believed to be 1m from my front wall. However, once I was sitting in the mix position and invested in a more accurate laser measurement tool, it later turned out to be 1.2 m.
Once you have entered your studio’s dimensions in DARDT, the next step is to input the monitor speakers you intend to use and your intended average listening level—in my case, 80dB.
Most current appropriate speakers and manufacturers are available in the spreadsheet. If you are undecided, this is a great place to input some various speakers and see how they would spec out in your space—this is how I learned that the Focal Sub6 would not work for me.
You should also notice that the JBL LSR310S shows up in yellow and only offers 2.7dB of headroom at 80dB. This is at a mixed position of 1.2m; if I change it to 1m of distance, it turns green and jumps to 3.7dB of headroom. For now, this is just suggested data, of course.
The iLoud MTM MKII monitors all spec fine across the board. Interestingly, this was not the case with the first-generation iLoud MTM monitors in the previous iteration of DARDT, which all spec’d a tad low. While I didn’t save a screenshot, this is a testament to the extra power, throw and headroom of the new MKII offering.
Once you are satisfied with your measurements and choices, DARDT will show you where it thinks you should put each monitor down to the millimeter and the recommended angle. You also get some general design considerations. The spreadsheet is interactive and you can hover over many of the boxes and get a quick visual pop-up to highlight angles and such.
When you are ready to start positioning the monitors in your room, you can switch to a much easier-to-read Design Print-out Sheet with distances and measurements at the ready.
A Logical Stopping Point
That’s all we have room for this month. Next month, we will begin installing our brackets, mounting and positioning our iLoud monitors, and wiring them up.
Until next time.

Moss Garden DARDT – Floor Plan